Showing posts with label Network and OS. Show all posts

Wednesday, August 10, 2011

Securing Your Router Mikrotik

To protect your MikroTik RouterOS™, you should do following things:

Change admin's password

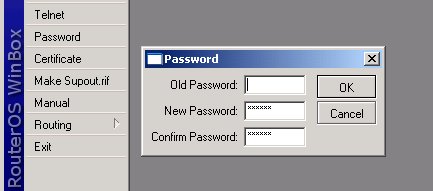
Just select the Password menu within the winbox GUI, for example:
Image:password_change.jpg
Or, type the following command in the CLI:
[admin@MikroTik] > / password 
old password: 
new password: ******
retype new password: ******
This will change your current admin's password to what you have entered twice. Make sure you remember the password! If you forget it, there is no recovery. You need to reinstall the router!

Add users to the system

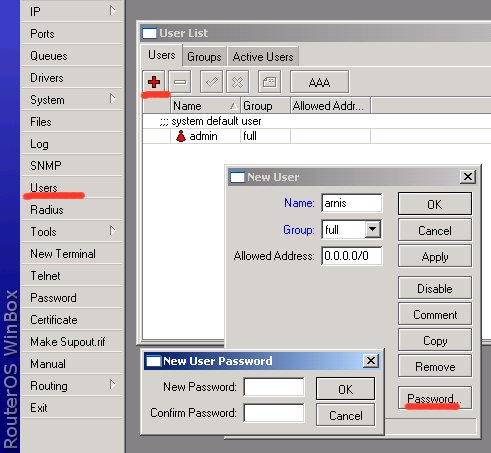
You should add each user that is going to log on to the router as a separate user and specify group of privileges. Add yourself as user of group full (same as for admin), for example:
Image:new_user_add.jpg
You may create new groups for users with specific tasks.

Set up packet filtering

All packets with destination to the router are processed against the ip firewall filter's input chain. Note, that the input chain does not affect packets which are being transferred through the router!
You can add following rules to the input chain under /ip firewall filter (just 'copy and paste' to the router using Terminal Console or configure the relevant arguments in WinBox):
/ ip firewall filter
add chain=input connection-state=established comment="Accept established connections"
add chain=input connection-state=related comment="Accept related connections"
add chain=input connection-state=invalid action=drop comment="Drop invalid connections" 
add chain=input protocol=udp action=accept comment="UDP" disabled=no 
add chain=input protocol=icmp limit=50/5s,2 comment="Allow limited pings" 
add chain=input protocol=icmp action=drop comment="Drop excess pings" 
add chain=input protocol=tcp dst-port=22 comment="SSH for secure shell"
add chain=input protocol=tcp dst-port=8291 comment="winbox" 
# Edit these rules to reflect your actual IP addresses! # 
add chain=input src-address=159.148.172.192/28 comment="From Mikrotikls network" 
add chain=input src-address=10.0.0.0/8 comment="From our private LAN"
# End of Edit #
add chain=input action=log log-prefix="DROP INPUT" comment="Log everything else"
add chain=input action=drop comment="Drop everything else"
Use /ip firewall filter print input stats command to see how many packets have been processed against these rules. Use reset-counters-all command to reset the counters. Examine the system log file /log print to see the packets which have been dropped. 
You may need to include additional rules to allow access from certain hosts, etc. Remember that firewall rules are processed in the order they appear on the list! After a rule matches the packet, no more rules are processed for it. After adding new rules, move them up using the move command.
Note, if you mis-configured the firewall and have locked yourselves out from the router, you may use MAC telnet from another router or workstation on the same LAN to connect to your router and correct the problem.

Saturday, July 2, 2011

Berikut adalah 5 keunggulan Thunderbolt

Kemunculan Intel Thunderbolt Saat peluncuran Mac Book Pros yang baru, Intel mengumumkan kehadiran teknologi Thunderbolt, yang menurut Intel sebagai cara baru untuk mentrasnfer data lebih bagus.
Teknologi yang awalnya bernama Light Peak itu merupakan era baru untuk menggeser posisi banyak penggunan protokol PC saat ini seperti, FireWire, HDMI, SATA, SCSI, dan USB. Dikutip melalui PC Magazine , Senin (28/2/2011), Thunderbolt tidak hanya menawarkan teknologi baru, juga kemampuannya yang setara dengan USB 3.0.

Berikut adalah 5 keunggulan Thunderbolt, yang layak Anda ketahui,
1. Super cepat dalam mentransmisi data. Thunderbolt menggabungkan kemampuan PCI Express (PCIe) dan protokol DisplayPort, dan mampu bidireksional mentransfer data antara komputer dan peripheral dengan kecepatan 10 Gbps, cukup cepat untuk mentransfer panjang film Blu Ray di bawah 30 detik, dan lebih dari dua kali lebih kecepatan USB 3.0 (4,8 Gbps).
2. Menjawab Teka-teki. Meskipun awalnya diposisikan Intel Light Peak sebagai teknologi optik, namun iterasi pertama akan menggunakan kabel tembaga. Selain teknologi murah dan tentunya mengkonsumsi energi dengan lebih ringkas.
3. Masa depan akan lebih cepat. Intel telah menyatakan bahwa, dalam dekade berikutnya, dimungkinkan untuk teknologi Thunderbolt untuk akhirnya skala sampai dengan kecepatan 100 Gbps. (Namun, Ini tidak mungkin bahwa kecepatan ini dapat dicapai tanpa kabel optik)
4. Re-port untuk bertugas. Meskipun Thunderbolt dirancang untuk bekerja dengan protokol transmisi, namun prot khusus harus dirancang untuk mengambil keuntungan penuh dari kemampuan kecepatan. Port Thunderbolt di MacBook baru identik dengan Mini DisplayPort jack, sehingga setiap Mini-DisplayPort kabel atau adaptor-harus bekerja di dalamnya.
5. Keajaiban miniaturisasi. Thunderbolt telah dimungkinkan oleh Intel miniaturisasi transceiver optik yang diperlukan, yang mengubah listrik untuk cahaya dan sebaliknya. (tyo) Bagi Anda pengguna ponsel,

Intel Memperkenalkan Teknologi Light Peak (Thunderbolt)

Akhirnya Teknologi Intel Light Peak telah dirilis. Intel menyebut konektor Light Peak ini dengan Thunderbolt. Konektor yang menawarkan kecepatan koneksi hingga 1Gbps (700Mbps real) untuk transfer data dan komunikasi antar perangkat. Well, langsung saja kita lihat beritanya 
Lama ditunggu-tunggu Puncak teknologi Intel Cahaya, sekarang dikenal secara resmi sebagai Thunderbolt, akhirnya tersedia pada perangkat konsumen pertama, dan perusahaan hari ini meluncurkan rincian lebih lanjut tentang kapan kita akan melihatnya dalam PC konsumen dan gadget.
Pertama diperkenalkan pada Konferensi Pengembang Intel kembali pada tahun 2009, data transfer teknologi menjanjikan untuk menggantikan beberapa port dengan satu yang dapat melakukan lebih banyak hal, dan melakukannya lebih cepat.
Inklusi pertama di komputer adalah di Apple MacBook Pro line, yang sebelumnya segar hari ini dengan port Thunderbolt melintasi garis (lihat CNET tangan-di sini). Intel diikuti beberapa jam kemudian dengan konferensi pers tentang teknologi, serta rencana untuk membawanya ke komputer dan perangkat selama tahun depan atau lebih.
Untuk membantu pembaca lebih memahami apa teknologi ini dan mengapa hal itu penting, CNET telah mengumpulkan FAQ ini.

Apa Thunderbolt?
Thunderbolt baru Intel input / output teknologi yang menjanjikan untuk membawa kecepatan transfer yang melebihi apa yang saat ini tersedia dengan USB 3.0, serta memperluas kecepatan yang di beberapa perangkat sekaligus. Dalam hal di mana Anda akan melihatnya, Thunderbolt akan muncul sebagai pelabuhan baru pada laptop dan PC, serta pada perangkat yang mendukungnya.
Teknologi itu sendiri memanfaatkan DisplayPort yang ada dan PCI-Express Data protokol untuk membuka apa yang dapat Anda lakukan dengan port tunggal menjadi beberapa menggunakan dan pada kecepatan tinggi. Ini termasuk "daisy chaining" sampai tujuh Thunderbolt dilengkapi perangkat bersama, sementara tetap mempertahankan kecepatan penuh di semua dari mereka sekaligus.

Seberapa cepat itu?
Thunderbolt saat ini berjalan dengan kecepatan tertinggi 10Gbps, meskipun berjanji untuk 100Gbps atas satu hari dalam throughput data ketika bergerak dari kawat tembaga ke serat optik. Untuk sementara, kawat tembaga memiliki kecepatan dan batas-batas panjang kabel, panjang kabel pada menjaga 3 meter atau kurang. Transfer data juga dua arah, yang berarti dapat baik mengirimkan dan menerima data pada saat yang sama, dan pada kecepatan tertinggi.
Selama konferensi pers Intel tentang teknologi pagi ini, perusahaan menunjukkan itu bekerja pada MacBook Pro, menarik empat baku, sungai terkompresi 1080p video melalui array penyimpanan Thunderbolt, dan memberi makan ke layar Thunderbolt terpasang, semua sementara topping lebih dari 600Mbps dalam kecepatan transfer nya. Sebuah tes sebelumnya hanya mentransfer file telah mendapat itu sampai 800Mbps.
Untuk menempatkan ini dalam perspektif apa yang telah tersedia hingga titik ini, yang dua kali lebih cepat sebagai batas teoritis USB 3.0, 20 kali lebih cepat dari USB 2.0, dan 12 kali lebih cepat dibandingkan FireWire 800.

Kapan saya bisa mendapatkannya?
Panjang dan pendek itu adalah bahwa Anda bisa mendapatkan Thunderbolt hari ini, asalkan Anda membeli Apple MacBook Pro, yang merupakan laptop pertama untuk kapal dengan port Thunderbolt sebagai port standar di seluruh lini.
Sejauh tiba pada laptop PC dan komputer desktop, perusahaan saat ini memperkirakan bahwa kita tidak akan melihat di sana sampai awal tahun depan diberikan OEM siklus desain. Untuk sementara, akan ada membunuh Thunderbolt-siap perangkat seperti hard drive dan menampilkan yang akan mengambil keuntungan dari teknologi tiba di musim semi. Salah satu yang pertama akan menjadi Lacie hard drive eksternal yang disebut Little Big Disk yang bungkus beberapa drive solid state dalam kandang tunggal yang bekerja dengan Thunderbolt.
Apakah saya dapat menambahkan ke PC atau laptop lama saya?
Jika mesin lama Anda adalah PC Anda dibangun, mengganti motherboard dengan yang akan membawa Thunderbolt akan melakukan trik. Selama konferensi pers Intel hari ini, perusahaan tinggal ibu pada penawaran sebagai ekspansi ke PC melalui slot PCI Express, atau laptop melalui teknologi ExpressCard.

Apakah ini menggantikan USB?
Intel posisi Thunderbolt sebagai teknologi "berdekatan", salah satu yang akan pujian itu. Yang mengatakan, mana-mana USB berarti itu tidak terjadi di mana saja dulu. Intel juga telah menyatakan rencananya untuk mendukung USB 3.0 di chipset masa depan bersama Thunderbolt.

Intel Introduces Technology Light Peak (Thunderbolt)

Finally, Intel has released Light Peak. Intel calls this connector with Thunderbolt Peak Light. Connectors that offer connection speeds up to 1Gbps (700Mbps real) for data transfer and communication between devices. Well, we just see the news
 Intel's long-awaited Light Peak technology, now known formally as Thunderbolt, is finally available on its first consumer device, and the company today unveiled more details about when we'll be seeing it in consumer PCs and gadgets.
First unveiled at Intel's Developer Conference back in 2009, the data transfer tech promises to replace a handful of ports with one that can do more things, and do them faster.
Its first inclusion in a computer is in Apple's MacBook Pro line, which refreshed earlier today with Thunderbolt ports across the line (see CNET's hands-on here). Intel followed up a few hours later with a press conference about the technology, as well as its plans to bring it to computers and devices over the next year or so.
To help readers better understand what the technology is and why it matters, CNET has put together this FAQ.

What is Thunderbolt?
Thunderbolt is Intel's new input/output technology that promises to bring transfer speeds that exceed what is currently available with USB 3.0, as well as extending that speed across several devices at once. In terms of where you'll see it, Thunderbolt will appear as a new port on laptops and PCs, as well as on devices that support it.
The technology itself makes use of existing DisplayPort and PCI-Express data protocols to open up what you can do with a single port into multiple uses and at high speeds. This includes "daisy chaining" up to seven Thunderbolt-equipped devices together, while retaining full speed across all of them at once.

How fast is it?
Thunderbolt currently runs with a top speed of 10Gbps, though promises to one day top 100Gbps in data throughput when it moves from a copper wire to optical fiber. In the interim, copper wire has both speed and cable length limits, keeping cable length at 3 meters or less. The data transfer is also bidirectional, meaning it can both transmit and receive data at the same time, and at its top speed.
During Intel's press conference about the technology this morning, the company demonstrated it working on a MacBook Pro, pulling four raw, uncompressed 1080p video streams through a Thunderbolt storage array, and feeding into a Thunderbolt-attached display, all the while topping more than 600MBps in its transfer speeds. An earlier test of just file transferring had gotten it up to 800MBps.
To put this in perspective of what's been available up to this point, that's twice as fast as the theoretical limit of USB 3.0, 20 times faster than USB 2.0, and 12 times faster than FireWire 800.

When can I get it?
The long and the short of it is that you can get Thunderbolt today, so long as you buy Apple's MacBook Pro, which is the first laptop to ship with a Thunderbolt port as a standard port across its entire line.
As far as it arriving on PC laptop and desktop machines, the company today estimated that we wouldn't see it there until early next year given OEM design cycles. In the interim, there will be a slew of Thunderbolt-ready devices like hard drives and displays that will take advantage of the technology arriving in the spring. One of the first will be a LaCie external hard drive called the Little Big Disk that packs multiple solid state drives in a single enclosure that works with Thunderbolt.
Will I be able to add it to my old PC or laptop?
If your old machine is a PC you built, replacing its motherboard with one that will carry Thunderbolt will do the trick. During Intel's press conference today, the company stayed mum on offering it as an expansion to PCs through PCI Express slots, or laptops through ExpressCard technology.

Does this replace USB?
Intel is positioning Thunderbolt as an "adjacent" technology, one that will compliment it. That said, USB's ubiquity means it's not going anywhere just yet. Intel has also said it plans to support USB 3.0 in future chipsets alongside Thunderbolt.

How much will it cost?
Intel has stayed mum on cost besides saying that it was competitive with other high performance I/O solutions. As far as its inclusion in the new MacBook Pros, it's been added as a standard feature across the entire line, versus being a paid add-on at the time of configuration.
The same cost principle goes for Thunderbolt's cables too. Because Thunderbolt is not an open specification, that means companies cannot simply make their own through a license, though that could change once we're into the lifespan of the product.

Konektor Intel Light Peak aka Thunderbolt 
 While his photographs can be viewed here
sini


The new Thunderbolt technology will be available in Apple's new MacBook Pro, which was also announced today. One of the new MacBook Pro notebooks was used at Intel's demo.


Thunderbolt shares the same port design as DisplayPort technology and is compatible with DisplayPort 1.1 or later. Looking from Apple's perspective, Thunderbolt is DisplayPort plus much more.


The new MacBook Pro comes with only one Thunderbolt port. This one port, however, can be used to connect to multiple devices via daisy chain.


It was connected to a six-bay external hard drive and Apple's Cinema Display monitor at the same time. This is possible thanks to the fact that the external hard drive has two Thunderbolt ports. One is connected to the notebook, the other to the external display. Thunderbolt allows for connecting up to seven devices this way, without lowering the bandwidth.


The six-bay external hard drive is from Promise. Intel says that, apart from Apple, there are a wide range of hardware vendors that have adopted Thunderbolt, which means consumers can expect many Thunderbolt-enabled products in the near future.


Also available at the demo was another, more portable, hard drive from LaCie, the Little Big Disk.


It also comes with two Thunderbolt ports.


The demo showcased the unprecedented throughput speeds that Thunderbolt offers, which is around 700MBps in the photo. Note that existing hard drives offer a maximum of just 6Gbps speeds via the third generation of SATA.


Intel's press conference announcing the new technology


Thunderbolt allows for high-speed bidirectional connectivity. It uses both copper and optical cables. The former has the max length of 3 meters, and the latter can be many meters long.
The technology can be used with any existing peripheral protocols (USB, FireWire, eSATA) via adapters. It can't be upgraded via add-in adapters, however, and users will need to get a new computer or motherboard.
According to Intel, Thunderbolt is designed to co-exist with USB and will slowly change the way users interact with peripheral devices. In the future, the technology can be scaled up to support speeds of up to 100Gbps.  
Thunderbolt is a new connector on all the latest Macbook Pro which can be found here http://www.apple.com/macbookpro/specs.html. As for other non-Apple computers, please be patient waiting for ya: D

I think, Thunderbolt is ideal for professionals who require high-speed connections to other devices such as external hard disk, server storage and dual monitors with just one connector only: shock:. : D but who knows could replace the USB 3.0 technology and mass-produced

Monday, May 9, 2011

Mikrotik MRTG / Graphing

Graphing adalah tool pada mokrotik yang difungsikan untuk memantau perubahan parameter-parameter pada setiap waktu. Perubahan perubahan itu berupa grafik uptodate dan dapat diakses menggunakan browser.
Graphing dapat menampilkan informasi berupa:
    * Resource usage (CPU, Memory and Disk usage)
    * Traffic yang melewati interfaces
    * Traffic yang melewati simple queues

Mengaktifkan fungsi graping
Klik menu Tool >Graphing>Resource Rules
Adalah mengaktifkan graphing untuk resource usage Mikrotik. Sedangkana allow address adalah IP mana saja yang boleh mengakses grafik tersebu,. 0.0.0.0/0 untuk semua ip address.
 Klik menu Tool>Graphing>Interface Rules
Adalah mengaktifkan graphing untuk monitoring traffic yang melewati interface, silahkan pilih interface yg mana yang ingin dipantau, atau pilih “all” untuk semua.
Graphing terdiri atas dua bagian, pertama mengumpulkan informasi/ data yang kedua menampilkanya dalam format web. Untuk mengakses graphics, ketik URL dengan format http://[Router_IP_address]/graphs/ dan pilih dari menu-menu yang ada, grafik mana yang ingin ditampilkan.
Contoh hasil grafik untuk traffic interface public:


Demikian, tutorial yang sedikit penulis sampaikan untuk sekedar membagi ilmu atau menyederhanakan untuk memudahkan pemahaman dari tutorial yang sudah tersedia di situs resmi mikrotik.

Friday, April 1, 2011

Setting Speedy dengan Router Mikrotik (pppoe-client)

Tip ini saya tulis dari pengalaman saya memakai Speedy dengan modem ADSL Articonet ACN-100R dan TP-Link TD 8817 yang kualitasnya tidak jauh berbeda. Dari pengalaman, jika dial-up speedy dilakukan oleh kedua modem tersebut, secara periodik koneksi akan terputus tanpa sebab yang jelas. It sucks! Menurut analisa beberapa rekan dan tenaga outsource Telkom Speedy sendiri, hal ini disebabkan karena buffer memori modem sudah kelebihan beban. Hal ini menyebabkan proses dialing terganggu. Karena sampai beberapa tahap gangguan ini membuat jengah, saya kepikiran untuk mengalihkan fungsi dial-up koneksi speedy ke komputer yang difungsikan sebagai router.
Saat itu saya langsung teringat pada beberapa perangkat komputer yang sudah tidak digunakan lagi teronggok di gudang. Daripada beli komputer atau router baru, mending saya ‘hidupkan kembali’ perangkat-perangkat veteran tersebut agar bisa merasakan masa kejayaannya lagi. he he he …
Akhirnya setelah semalaman berkutat dengan perangkat lawas dan debu, akhirnya saya bisa satukan kembali sebuah PC dengan processor P III 750MHz , 256MB SDRAM, dan sebuah harddisk 40GB. Ya, lumayan lah…
Selanjutnya komputer Veteran saya akan mengambil alih tugas modem melakukan dial-up speedy. Kurang dari 5 menit, seting mikrotik sudah selesai. Selanjutnya saya tempatkan posisinya dalam jaringan sebagai berikut
[INTERNET]——[MODEM ADSL]——[ROUTER ]——[SWITCH]———[CLIENT]
xxx.xxx—192.168.1.1/192.168.1.100—192.168.1.103/192.168.30.1—192.168.30.2-192.168.30.254
SETTING MODEM ADSL
Buka browser Anda, masukkan alamat modem (defaultnya adalah http://192.168.1.1)
  • Masukkan username dan password : admin/admin
  • Masuk ke menu “Advanced Setup” kemudian pilih “WAN” dan klik tombol “Edit” Masukkan nilai PVC
  • Configuration : (masukkan nilainya sesuai wilayah TELKOM masing-masing daerah)
    VPI = X (setting saya=8)
    VCI = XX (setting saya=8)
    informasi ini bisa didapatkan dari petugas Telkom atau teknisi yang melakukan instalasi.
  • Service Category = UBR Without PCR, kemudian klik Next
  • Connection type = Bridging
  • Encapsulation = LLC, kemudian klik tombol Next
  • Tandai check box pilihan “Enable Bridge Service”, Next dan akhiri dengan Save
  • Selanjutnya klik tombol Save/Reboot, tunggu beberapa saat +- 2 menit hingga proses reboot modem selesai.
Untuk Modem TP-Link TD8117 lebih mudah. Ikuti saja langkah step-by-step nya dari Menu Start Up > Wizard > Pilih koneksi Bridge > Akhiri dengan Finish. That’s it!
SETTING ROUTER
Sudah banyak dimaklumi bahwa agak susah memberikan identifikasi pada Lan Card. Agar lebih mudah mengingat, Pertama kita beri nama masing-masing LAN Card yang ada pada . sebagai berikut.
/interface ethernet set ether1 name=speedy
/interface ethernet set ether2 name=lokal
Setelah masing-masing LAN card diberi nama, tentukan IP-nya
ip address add address=192.168.1.103/24 interface=speedy
ip address add address=192.168.30.1/24 interface=lokal
periksa apakah nama card lan dan ip yang diberikan sudah benar.
ip address print
Kemudian lakukan test ping ke masing masing IP tersebut untuk memastikan konfigurasi sudah tepat.
Selanjutnya, aktifkan fitur PPOE Mikrotik untuk melakukan dial ke modem ADSL Speedy. Berikut ini akan kita bahas cara dial-up dengan menggunakan baris perintah di terminal. Anda bisa juga lakukan hal ini lewat Winbox. Baca juga Panduan Setting PPOE-Client Speedy dari Winbox di bagian lain blog ini.
/interface pppoe-client add name=pppoe-client-speedy user=142xxxxxxxxx@telkom.net
password=XXXXXXXXXX interface=speedy service-name=internet disabled=no
/ip route add gateway= 125.124.123.1
IP Gateway ini bisa ditemukan dari dengan mengetik perintah ipconfig dari command pada saat speedy sudah di dial dariwindows. Anda juga bisa dapatkan informasi ini dari status konfigurasi modem (lewat browser seperti yang disampaikan pada setting modem di atas).
Periksa sekali lagi apakah settingan yang kita lakukan sudah benar dengan:
/ip route print
SETTING DNS
Masukkan kode berikut untuk melakukan setting DNS Speedy:
/ip dns set primary-dns=202.134.1.10 allow-remote-request=yes
/ip dns set secondary-dns=202.134.0.155 allow-remote-request=yes
Selanjutnya setting masquerade, untuk meneruskan perintah dari routing dari semua client ke NAT firewall .
/ip firewall nat add chain=srcnat action=masquerade
Langkah terakhir, buka winbox, pada menu pppoe yang barusan Anda buat, masuk ke menu PPP > Interfaces > dobel klik koneksi Anda > pilih Tab Dial Out, pastikan untuk menandai check box “add default route”.


Setelah Proses diatas selesai, lakukan ping ke 202.134.0.10. jika koneksi terhubung berarti Gateway speedy sudah dimasukkan dalam daftar dan Anda dapat mulai berselancar.
TROUBLESHOOT
Jika BELUM UP, periksa kembali:
  1. Cek koneksi kabel dari modem ke perangkat
  2. Cek username dan password speedy
Jika Ping belum jalan atau muncul pesan error “Invalid value for argument addresses” berarti ada satu hal yang terlewat.
  • Buka Winbox, masuk menu PPP. Dobel klik pada ppoe yang aktif. Tandai Check Box “Add default route” dan “Use peer DNS
Jika masih ada yang bingung, baca panduan di forum dan lihat step-by-step video tutorial dari forum sebelah jika diperlukan. Baca juga pengalaman seorang rekan tentang setting .

Thursday, January 6, 2011

SNR Margin dan Line Attenuation untuk speedy

SNR Margin dan Line Attenuation

Indikator awal baik/buruknya sambungan xDSL anda

Buat yang sudah berlangganan internet dengan teknologi ADSL misalnya pasti sudah akrab dengan yang namanya SNR margin dan Line Attenuation. Informasi ini bisa anda dapatkan di bagian ADSL Status pada menu modem. Nilainya bisa bervariasi dan selalu berubah - ubah. Mari kita bahas satu persatu.

SNR = Signal to Noise Ratio. Untuk lebih jelas, mari kita lihat rumusnya

Jelas kan, nilai SNR dipengaruhi oleh kekuatan signal dan besarnya noise (gangguan). Secara kasar tanpa melihat nilai power signal dan noise, semakin bisar nilai SNR maka kualitas yang didapat akan semakin baik (bisa jadi signalnya yang besar atau noisenya yang kecil).

Sedangkan Line Attenuation (dB) adalah besarnya faktor redaman kabel. Tau sendiri kan kabel punya yang namanya velocity factor. Tentunya semakin panjang maka loss-nya akan semakin besar. Rumusnya

Loss (dB) = 10 log (P m2/P m1)

dimana :
P m1 adalah pembacaan power di titik awal
P m2 adalah pembacaan power di titik akhir

Setiap kabel memiliki nilai yang berbeda - beda tergantun dari bahan dan luas penampang kabel. Nah logikanya, semakin kecil nilai Line Attenuation maka akan semakin baik.

Perlu diingat bahwa nilai SNR margin yang paling minimum adalah 10-11 dB karena apabila kurang dari itu makan proses sync antara modem dengan DSLAM akan terganggu yang menimbulkan internet di tempat anda akan sering putus - putus.

Oke, kali ini saya akan berbagi bagaimana kualitas sambungan ADSL ke rumah saya. Modem yang saya gunakan adalah D-Link DSL 2640T (modem & wireless router). Nah, ketika saya lihat status SNR margin dan Line Attenuation, terbaca seperti ini :
Wow, berarti bagus banget dong?? Pastinya ... dengan kualitas sambungan yang oke seperti ini sampai hari ini saya tidak pernah mengalami masalah (padahal sudah setahun lebih langganan internet broadband ini). Selain itu yang membuat nilai line attenuation kecil sekali karena posisi rumah saya sangat dekat sekali dengan sentral telepon (baca:kantor telkom). Pengen tau seberapa dekat? yaaa kurang lebih 20 meter-an lah. :)

Emang sih teknologi ADSL memiliki kelemahan dimana semakin jauh posisi kita dengan sentral telepon, maka kualitasnya semakin menurun. Maka jangan heran kalo kita pake speedy oke - oke aja sedangkan temen yang lain malah sering bermasalah bisa jadi karena kualitas sambungan yang buruk serta diperparah dengan modem yang kurang bagus.

Thursday, December 30, 2010

Phone cell Windows Nokia Concept

What would happen if one day the Nokia is really partnering with Microsoft, the phone presents the Windows? Moreover, the current CEO Stephen Elop Nokia, is a former Microsoft employee.

Problems does the rumor come from this Murtazin Eldar began to roll since some last week. Men who come from these reviews Mobile sebelulmnya revealed that Nokia will release a mobile phone.

But this is a bit outside of logic. The reason Nokia has its own ecosystem, while Microsoft also. Plus the Nokia center menggodong serious MeeGo concept which is expected to be the savior the Finnish company.

From the leaked concept video, black silver cell phone this slim candybar form, with the Nokia logo on the front and rear. But at the bottom of the phone has three menu buttons as other Windows mobile phones.

The following is a video design concept created Mindsailors Design Studio. Amid the onslaught of the current smartphone market competition, whether Nokia is really realize the phone with Microsoft's OS? According to you?
This Video Concept Nokia Windows

Wednesday, December 29, 2010

Configure the DWL-2100AP

Web Configuration Utility
First, disable the Access the Internet using a proxy server function. To disable this function, go to Control Panel > Internet Options > Connections > LAN Settings and uncheck the enable box.
Open your web browser program such as Internet Explorer. Type the IP address of the DWL-2100AP in the address field (http://192.168.0.50) and press Enter. Make sure that the IP addresses of the
DWL-2100AP and your computer are in the same subnet.
After the connection is established, Enter your user name (admin) and your password (leave blank by default). Click OK to continue.
Installation Considerations
D-Link Air lets you access your network from anywhere you want. However, keep in mind, that range is limited by the number of walls, ceilings, or other objects that the wireless signals must pass through. Typical ranges vary depending on the types of materials and background RF noise in your home or business. The key to maximizing range is to follow these basic principles:
1. Keep the number of walls and ceilings to a minimum - Each wall or ceiling can rob your
D-Link Wireless product of 3-90 ft. of range. Position your Access Points, Residential Gateways, and computers so that the number of walls or ceilings is minimized.
2. Be aware of the direct line between access points, routers, and computers - A wall that is 1.5 feet thick, at a 45 degree angle, appears to be almost 3 feet thick. At a 2-degree angle it looks over 42 feet thick. Try to make sure that the access point and adapters are positioned so that the signal will travel straight through a wall or ceiling for better reception.
3. Building materials make a difference - A solid metal door or aluminum studs may have a negative effect on range. Try to position access points, routers, and computers so that the signal passes through drywall or open doorways and not other materials.
4. Make sure that the antenna is positioned for best reception by using the software signal strength tools included with your product.
5. Keep your product away (at least 3-6 feet) from electrical devices that generate RF noise, like microwaves, monitors, electric motors, UPS units, etc.
6. If you are using 2.4GHz cordless phones or X-10 (wireless products such as ceiling fans, lights, and home security systems), your wireless connection will degrade dramatically or drop completely. Anything using the 2.4Ghz frequency will interfere with your wireless network.
Installation

Feature Netbook Ubuntu Linux

Features

Ubuntu Netbook is a simple, secure and reliable way to use your netbook. It gives you instant access to all the free applications you’ll need, wherever you are.

The Unity interface

Enjoy the simplicity of Ubuntu Netbook Edition’s new interface. Designed specifically for the smaller screen and for computing on the move, it lets you find and rediscover your preferred applications more easily whether they are on your netbook or on the web. Beautiful, crisp, responsive and intuitive.


Social from the start

Ubuntu's new Me Menu lets you access your Facebook and Twitter accounts straight from the desktop. You can connect to all your favourite chat channels and make updates through a single window. Being connected for work or fun has never been so easy.

Email and chat

Ubuntu provides a great choice of apps to make communicating quick and easy. Email with Evolution and integrate your Yahoo, Gmail, MSN, Jabber, AOL and QQ accounts so you can chat, twitter and email anyone, anywhere.

Get all the software you need

The Ubuntu Software Centre gives you instant access to thousands of open-source and carefully selected free applications. And now you can buy apps too. Browse software in categories including: education, games, sound and video, graphics, programming and office. All the applications are easy to find, easy to install and easy to buy.

Music streaming to your phone

New in 10.10. Ubuntu's music player includes an integrated store, so you can buy and download new tracks with just a few clicks. And thanks to Ubuntu One's file-syncing magic you can stream your music uninterrupted to your Android device or iPhone.

Photo magic

Ubuntu is chock full of apps to help you manage, fix and share your photos with the world, whatever gadget you use to take them. Support for cameras and phones is legendary and all without drivers. And Shotwell allows you to manage and share your pictures easily - on all the most popular photo and social network sites. And did we mention the apps are free?


Discover Ubuntu One

Ubuntu One is the personal cloud service that simplifies your digital life. Imagine buying music and getting it delivered to the computers of your choice. Or synchronising your files and notes and accessing them from anywhere. Or consolidating your computer and mobile phone contacts and safely sharing documents and pictures with them. Ubuntu One does all this and more.

Make, play and edit video

Watch all your favourite content from YouTube, iPlayer, and MSN Player. Play your own videos with Movie Player or use Pitivi to edit your videos.

Choose from hundreds of games

The Ubuntu Software Centre offers hundreds of games, including puzzles, adventures, tactical challenges and more. All free to choose and free to use

Accessibility in Ubuntu

At the heart of Ubuntu's philosophy is the belief that computing is for everyone, whatever your circumstances. Ubuntu is one of the most accessible operating systems and is fully translated into 25 languages with more being added all the time.

download http://www.ubuntu.com/netbook/get-ubuntu/download

Monday, December 27, 2010

Linux Operating System

Development of Linux

Linux Kernel Website 2007 1986 Linus (Benedict) Torvalds programmed its own driver for its floppy controller. He learned intensively hardware programming and became better knowledge about his Sinclair computer with Q-DOS. Additionally he provided his own programmer Tools. When 1991 the 386-Intel PC became modern, he got one PC to learn about the programming of 386 CPUs. As operating system the Unix derivate MINIX was used, he has know Unix already since 1990 from its university. Minix was developed by Andrew Tanenbaum as learning system and was particularly used at universities. The written book from A. Tanenbaum "Operating Systems: Design and Implementation" is about operating system concepts and Minix, which became the favourite book from Torvalds. The source code of Minix is open source, any modifications are bound to the license conditions.

Because he did not find the provided terminal emulator program in Minix acceptable, he began his project to code his own and better terminal emulator with more functions on hardware level. In addition he programmed his own drivers for the data medium access and the file system and others in assembler. With these functions the software becames the ability to upload and download from the Internet. In the line of the development terminal program got more and more functions so he made the decision to enhance it to a operating system. Its operating system was derivated from concepts of Minix but completely written from scratch beginning at the Kernel. After long programming evenings it was so far. On 17th September 1991 the operating system Freax version 0.01 was finished, as development environment was used still the MINIX for 386 CPUs. It contained already the GNU Shell bash and the GNU C-compiler GCC from Richard Stallman, which counts to the standard programs for the meantime named operating system Linux. Because Linux profits particularly from the GNU software pool, it is generally called GNU/Linux.

After approximately 6 months Freax was renamed in Linux. Already on 3th July 1991 he had asked for the POSIX standards in the minix-newsgroup, he presented on 25th August 1991 his project in public and asked for suggestions for further functions and extensions. The source code was made freely accessible by ftp. To communicate with other programmers and interested people he used the Maylinglist "Linux-activists@niksula.hut.fi" and the newsgroup "comp.os.minix" for contact and progress messages. Later its own Maylinglist and forums were created. In the line of the development he received wished postcards from all over the world with thankfully words. The project has got a strong self-dynamic in the InterNet and was maintained by the community. The rights at the brand name Linux was transferred after a legal incident to Linus Torvalds and later distributed on several persons to ensure the further development and to avoid a "takeover by enemys". The symbol figure "Tux the penguin" was selected because Torvalds was bitten by a penguin in a Finnish zoo. The self-willed animal had impressed him in such a way, which it gave to its operating system this guidance figure. At the beginning Linux doesn`t contain any installation script or graphical installation menu. To make the installation from Linux easier and automated Owen LeBlanc from the Manchester Computing Centre published the MCC Interim release, this was the key for the automated installation of today's distributions.

File structure (first level) of Linux and derivatives

/ - Root-Directory
/bin - system tools
/boot - kernel, bootmanager
/cdrom - Mount-Point for CD-ROM drives (optional)
/dev - device files
/etc - configuration files
/floppy - Mount-Point for floppy drive(optional)
/home - user directory
/lib - shared Libraries
/mnt - mount Verzeichnis
/opt - additional software, GUI
/proc - system informations
/root - root user directory
/sbin - system programs for root
/tmp - temporary files
/usr - applications for the GUI, source code (kernel)
/var - various files, log files

Small reference of shell commands

mount - Mounts a filesystem
umount - Unmounts a filesystem
fdisk - Used to create or delete of partitions on a hard drive
hdparm - Get/set various hard disk geometry parameters
rm - Remove files
ls - List the contents of every subdirectory
dir - List the current directory content
cd - Change the current directory
dd - Bit based disk or data copy
ps - shows active processes
df - Shows the free space of any filesystem
find - Search for a file
mkdir - Make a directory
mv - Move or rename a file
vi - Editor with a command mode and text mode
killall - Kill processes by name
ifconfig - Configure a network interface
netstat - Information about the network connections
mc - File manager with visual shell


The advantages of a free development and distribution are among other things in the user orientation because no unnecessary features are integrated that nobody does need. That is done via the dynamic development process, which select principle from 1.000 current ideas the most necessary features out that taken up to the official system core. In order to meet all requirements, the Kernel series of 2.2.x (max. 2 GByte RAM addressably) exists beside the newer 2.4.x (max. 64 GByte RAM addressably) in coexistence. By the dynamic development a rigid marketing plan that rules about the release date is unimportant. In addition new versions are only published with proven reliability and are not determined if the schedule points to the best sales favorable time. While Linux 0.01 with the most fundamental components and instructions consisted of 10.000 code lines, the source code increased now in version of 2.4.9 to approximately 3.7 million code lines including many hardware drivers. Linux regards the specifications from system V and BSD Unix programs.
Some operating system companies use the open development to add new characteristics into the open source operating system as example the file system support XFS by SGI. Linux and related operating systems are only possible through the work of the InterNet Community that contains the support of developers world-wide and increasingly development support by IT companies. Therefore there are so-called developer kernel releases with odd version number like 2.3 and stable releases with straight numbers like 2.4 for the stable use for user and employment in companys. Matthias Ettrich announced the project Kool Desktop Environment (KDE) in the Usenet posting of October 14th, 1996. The GUI library Qt by Trolltech is used for the development. The first KDE main release happens in July 1998, the second release in October 2000, the thirth release in April 2002. The KDE desktop is besides gnome one of the most used user interfaces.

According to estimations there is at the beginning of 2001 at least 10 million Linux user world-wide, tendency strongly rising. Since about 1997/1998 Linux is regarded strengthened by the IT industry as alternative operating system. In the years 2000/2001 the assumption is expressed, that Linux can also replace the existing commercial Unix variants gradually and wins further agreements. In the heterogeneous network Linux co-operates by the native support of network protocols with Macintosh, Novell and Windows.

The General Public License version 1 was founded 1989 of Richard M. Stallmann. The GPL version 2 was written by the Free Software Foundation in 1991, since then the Linux Kernel is put under this licence. The final GPL version 3 came out on 2007-06-29. The license model GPL that Linux underlies, offers to the developer extensive liberties and spreads transfers of technology because the knowledge is open. By the open development code audits constantly improve the quality of the source code. By code sighting from various developers the software security is increased and the further development doesn`t depend on probritary manufacturer. Many Linux derivatives are available on the Websites of the Distributors and projects with ftp or HTTP for free Download at no costs. By redundant Mirror servers the operating systems are available in ISO images around the world.

Goals


- to create a better MINIX than MINIX (he was dissatisfied with MINIX)
- Unix derivated operating system on normal PCs
- open source development
- programming on this project with developers from around the world
- development after the needs of the users

Today Linus Torvalds lives and works in San Jose, California for the chip manufacturer Transmeta (CPU Crusoe). Besides he cares for the public work and develops together with others the system core further.

Update: 17. June 2003
Linus Torvalds changes to the OSDN (open source development lab) to take care mainly for for the future development of the Linux Kernels 2.6.x.

Distributors

A Distributor is usually a developer team that takes advance from the Linux system core (Kernel) to offer a installation-able software package. Beside the individually adaptable system core numerous additional applications, driver and assistant are included, which can be installed and configured with the own installation andsetup routine comfortably. Those distributions are made available on the Internet as ISO image or to buy cheap on CD-ROM or DVD medias. The taken money is needed for the developers and the support. Often Linux distributor companies are actively in other open source projects too.
In order to install a Linux distribution they exists different ways of installation. The booting of the installation routine from CD-ROM after the El-Torito standard, DVD, floppy disk (in the meantime rather rare), by network or ftp server after the boot procedure are supported directly. From the large and big offerers of Linux distributions profit small distributors which are aligned to very special operational areas, like data Recovery or software-routers.

30. May 2002: For the first time several large Distributoren united to a large community (see News note). Under the name UnitedLinux was created a common basis for the uniform development of a Linux distribution. Elements of it are guidelines of the Linux standard base. All participants of the partnership let its experiences in the business area and technical knowledge flow together to rise up the market share in the server range. Final desktop versions for customers are provided by each distributor separately. To the Comdex in November 2002 the initiators presented the finished version 1.0 together. United Linux 1.0 is thereby LSB 1.2 and OpenI18N conformal and flows in the future versions as standard. The Linux Standard Base 3.1 was published at 2006-06-21. This definition sets new guidelines for desktop applications, a own software development kit (SDK) and the certification for products to the LSB 3.1.

The Linux distribution Yellow Dog is created by the company Terra Soft. It was the first commercial Distribtuion for Apple G4 systems in 1999, followed of the support for the Playstation 3 of Sony for the first time in 2006. Terra released the updated Yellow Dog Linux version 5.0.1 in May 2007. This software based on the Fedora Core and uses the Enlightenment Window Manager E17. It contains more than 500 updated programms, new is the support for WLAN.

Turbolinux

The distribution based on Red Hat has her main field of application in Asia. Since the foundation of Turbolinux Inc. 1992 the supply was supplemented with commercial products and services. Turbolinux has strongly developed and established himself by the extended support of large IT enterprises. Since the beginning Turbolinux gives great importance to the internationalization of the software and is primarily in the industry on servers, but also on workstation. As a graphical surface were installed up to version 6.0 gnomes as a standard includet, the following versions set as standard the KDE desktop. RPM is used primarily as installation format.

With Turbolinux version 11 the manufacturer Turbolinux walks along new ways. The international version takes compatibility to Windows applications and supports the ActiveDirectory service. KDE or Xfce are available as a user interface, with CyberLink PowerDVD a commercial DVD player software is enclosed. With the progression desktop for Turbolinux the user will be able to migrate automatically data like e-mails and Office files from an existing Windows installation for Turbolinux. Contained is also the Kernel 2.6.12, X.org 6.8.2, GCC 3.4.3, Glibc 2.3.5 and RPM 4.4.2.

Turbolinux: date / version

1998 June / Turbolinux 1.0 (kyoto), Kernel 2.2.9
1999 May / Turbolinux 2.0 (okinawa), Kernel 2.2.13
1999 Juni / Turbolinux 3.0 (karatsu), Kernel 2.2.14
1999 Aug. / Turbolinux 4.0 (--), Kernel 2.2.15
2000 März / Turbolinux 4.2 (--), Kernel 2.2.17
2001 Aug. / Turbolinux 6.0 (--), Kernel 2.4.3
2001 Nov. / Turbolinux 7.0 (monza), Kernel 2.4.8
2002 May / Turbolinux 7.0S (esprit), Kernel 2.4.18
2002 Juli / Turbolinux 8.0 (silverstone), Kernel 2.4.19, gcc 3.2
2002 Okt. / Turbolinux 8.0S (vitamin), gcc 2.96, Kernel 2.4.18
2003 Okt. / Turbolinux 10D
2004 May / Turbolinux 10F
2004 Okt. / Turbolinux 10S
2006 May / Turbolinux 11


Lycoris Desktop/LX

Lycoris was founded in the year 2000 and resided in Redmond/Washington. Based on Linux the Lycoris Desktop/LX has his strengths primarily in the simplified installation and user guidance, at the boot process only a small line of text indicates the consoles Shell.

Current version: build 75 (beta) test: July 2003
The installation routine of Lycoris desktop/LX (amethyst, beta) is a instant set up, no package selection or details for the application area are allowed. At least 850 MByte of free hard disk space are therefore needed. The installation turns out very simple, according to detail of used hardware (mouse, keyboard, network, printer,...) starts the installation and at the same time a card game. Windowmanager is KDE 2.2.2, the Linux Kernel version 2.4.20 is used, the booting manager is grub that can boot other system partitions too. After the restart the system is established and a detailed ShockwaveFlash presentation starts with the english speaking introduction into the Lycoris Desktop/LX. The DMA mode was already activated at all drives.
Different problems have been noticed because of the beta status, in the final version they are maybe solved.

- nvidia graphics board doesn`t use 3D support
- Sound is palyed with noise and interruptions
- DVD playback isn`t reliably

On 09-13-04 Lycoris gave his Linux distribution Desktop/LX in version 1.4 free for release. The new Linux Kernel 2.4.27 and KDE 3.2.3 are contained.

FAUmachine

FAUmachine (formerly UMLinux) is open source and runs completely in the user mode (not privileged CPU mode) of Linux. It can access directly the hardware and is transparently for use to the host. The main memory is provided virtually in a protected area. Depending on resources many UMLinux systems can run at the same time.

Caldera Open Linux

Caldera, Inc. was founded in October 1994 by Bryan Sparks and taken over in January 1995 as a society. In summer 1998 Caldera Inc. has founded two subsidiary firms. Caldera Systems, Inc. responsible for the development and sale of Linux based Linux products in his main area on the PC market for desktop and servers computers like OpenLinux and Caldera Thin Clients Inc. with focus at solutions for Thin clients and the market for Embedded Systems like Embedix (embedded Linux OS) and DR DOS. In July 1999 the second named company was renamed to Lineo, Inc..

Renaming in August 2002 in SCO Group, now offers UnixWare and OpenServer products from the product take-over of SCO.

Corel Linux / Xandros

Corel Linux OS based on the Debian distribution this one has found worldwide big encouragement. The Linux division of Corel was sold to the Startup enterprise Xandros, inclusive of the developers in August 2001. Xandros has his headquarter in Ottawa, Canada. Still this year (2002) Xandros wants to publish the Xandros desktop OS 1.0 in a Standard, Deluxe and Server Edition. Unusual feature opposite other distributions is the integrated CrossOver Office, a special customization of the Wine project for the use of Microsoft Office 97/2000. The Xandros Professional desktop 4.0 appeared in November 2006. The standard file system is ext3 now, with CrossOver Microsoft Office can be used, the programmes Open Office 2.0.3, Firefox 2.0 were updated and the search tool Beagle is new.

Versions

DateVersion
1991 Sept.Freax 0.01 - still needs Minix and special gcc compiler,230 kbyte source code, incl. scripts and header files, minimal version, with floppy, keyboard and serial driver software, ext file system, 386 CPU support, UNIX-Shell bash
1991 Sept.Freax 0.02 - bash and gcc were ported by MINIX, needs 4 mbyte RAM for compiling software
1991 Oct.Freax 0.03 - small user group, gcc can compile himself on Linux, only needs 2 mbyte RAM for compiling software
1991 Nov.Freax 0.11 - international development team, first fixed disk driver software, mkfs/fsck/fdisk program, Hercules/MDA/CGA/EGA/VGA graphic, US/German/French/Finnish Keyboard, console can beep, Linux now has his own development environment
1992 Jan.Freax 0.12 - for the first time page-to-disk function built-in, Linux is put under the GPL, virtual memory, harddisk caching, POSIX job-control, more persons programming linux, multi-threading file system
1992 AprilLinux 0.96 - programmer and user group raised up, X Window system from the MIT is used for the first time
1994 MärzLinux 1.0 - 4,500 kbytes source code, incl. scripts and header files, more than 170,000 lines of source code, approx. 100 developers, approx. 100,000 users, first SCSI and sound driver software, for the first time networkable, ext2 file system
1995 MärzLinux 1.2 - 250,000 lines source code, about 50% are hardware driver, porting to alpha, MIPS, and SPARC CPUs, extended network functions like IP-Forwarding and NFS, IPX, AppleTalk
1996 JuniLinux 2.0 - 20,300 kbytes source code, incl. scripts and header files, approx. 800,000 lines of source code, porting to m68k and PowerPC CPUs, multi-processor capable up to 16 CPUs (experimental), symbol figure "Tux the penguin" was born
1997 AprilLinux 2.1.32 - after a trademark right dispute Torvalds lets register Linux as a trademark
1999 Jan.Linux 2.2.0 - 269 developers works on linux, approx. 10 million users, improved SMP support, IPv6 support as first operating system, extended software support by companies like StarOffice, Netscape
2000 JuniLinux 2.2.16 -
2001 Jan.Linux Kernel 2.0.39 Release, contains bug fixes for security holes
2001 Jan.Linux 2.4.0 - 375 developers works on linux, approx. 15 million users, runs on altogether 13 hardware plateforms, improved network support, improved performance for memory transactions, extended hardware support
2003 MärzLinux Kernel 2.2.25 Release
2003 JuniLinux 2.4.21 - Kernel 2.4.20 to 2.4.21 : 1738 code changes
2003 Dez.Linux Kernel 2.6.0 Release, optimized for big file storage devices and high data transfer rate, TCP/IP optimized, improved memory access and process scheduler, improvement in the threadings, improved Advanced Linux Sound Architecture (ALSA), contains Security-Enhanced Linux (SELinux)
2004 Feb.Linux Kernel 2.0.40 Release
2004 Feb.Linux Kernel 2.2.26 Release, contains bug fixes for security holes, last release of the 2.2 branch
2004 MarchLinux Kernel 2.6.4
2004 AprilLinux Kernel 2.4.26
2004 Aug.Linux Kernel 2.6.8
2004 Nov.Linux Kernel 2.4.28
2005 MarchLinux Kernel 2.6.11
2005 AprilLinux Kernel 2.4.30
2005 JuneLinux Kernel 2.6.12
2005 Oct.Linux Kernel 2.6.14
2005 Nov.Linux Kernel 2.4.32
2006 MarchLinux Kernel 2.6.16
2006 Sept.Linux Kernel 2.6.18
2006 Dec.Linux Kernel 2.4.34
2007 Feb.Linux Kernel 2.6.20
2007 JulyLinux Kernel 2.6.22

Friday, October 29, 2010

Setting ARP Statis di Windows 7

Berubah-ubah pada mac address gateway yang ada di cache komputer . Ya pas di cek lagi berubah lagi, begitu seterusnya. sehingga akses saya ke gateway jadi terganggu makanya gak bisa ngenet. Begitulah ulah anak2 di jaringan sini kadang-kadang mereka suka iseng banget. Ada beberapa motif dari Orang-orang iseng ini : diantaranya adalah mereka ingin mendapatkan bandwidth lebih gede sebagai akibat dari orang lain gak bisa ngenet, ada juga yang sengaja ingin mengintip data yang lalu lintas di jaringan pada korban yg sudah diracuni tabel arp nya, dan lain-lain. hmmm,,,,
Gara-gara masalah ini, langsung aja ane berniat ngerubah tabel arpnya agar menjadi statis. buka command prompt trus ngetikin perintah ini :

arp -s

tekan enter,,, dan Jrengggggggg…… muncul warning seperti berikut :
The ARP entry addition failed: The requested operation requires elevation.
Dalam hati koq aneh ya,,, karena biasanya pake perintah itu juga, mau windows ataupun linux untuk settingan ini biasanya perintahnya hampir sama, tapi koq muncul warning yg gak biasanya. :fyuh:… owh iya lupa saat ini ane lagi berada di lingkungan windows. Tepatnya windows 7. hehe… :)
nah setelah googling2 dengan paksaan yang terkadang bisa kadang nggak ini, ternyata hasil googling mengatakan perintahnya agak beda menjadi seperti ini :

netsh interface ipv4 add neighbors "Local Area Connection" alamat_IP mac_address

silahkan sesuaikan alamat IP dan Mac Addressnya…

contohnya :

netsh interface ipv4 add neighbors "Local Area Connection" 10.14.10.1 00-11-22-33-44-55

saat itu juga langsung ane praktekin dan akhirnya masalah selesaii, karena setelah ane cek lagi tabel arpnya udah statis dan test buka facebook, Lancarrrrr Jayaaaaaa :D . owh iya cara ngeliat tabel arp tadi ketik aja :

arp -a
jika udah muncul kata static di bagian kanan pada ip tadi, maka perintah diatas berhasil dijalankan. hehe… selamat mencoba bagi yang membutuhkan… ^_^ :D

Description: Software ini digunakan untuk menyerang router jaringan LAN. Komputer penyerang akan menguasai lalu lintas data, dan komputer lain yg terhubung melalui LAN ke router akan mengalami gangguan koneksi.
http://img528.imageshack.us/img528/1200/lanattacker.jpg
Baca Selengkapnya
LAN Attacker (Standalone tidak perlu instalasi) adalah sebuah
program yang dapat memindai, menyerang, mendeteksi dan melindungi komputer
jaringan area lokal.

Fitur sebagai berikut:
1,1 Scan
-. Ini dapat memindai dan menunjukkan host aktif di LAN
dalam waktu yang sangat singkat (~ 2-3 detik).
Ini memiliki dua modus pindai, satu adalah normal scanning, yang lain
adalah antisniff pemindaian. Kemudian adalah menemukan siapa yang
sniffing di lan.
-. Ini dapat menyimpan dan load file daftar komputer.
-. Ini dapat memindai Lan komputer baru secara teratur untuk daftar.
-. Ini dapat memperbarui daftar komputer dalam modus pasif menggunakan
mengendus teknologi, yaitu dapat memperbarui komputer
daftar dari alamat pengirim permintaan paket arp
tanpa memeriksa lan.
-. Dapat melakukan pemindaian lanjutan apabila Anda membuka maju scanning dialg di menu.
-. Ini dapat memindai kelas B range ip di scan lanjutan dialg.
-. Ini dapat memindai acthost tercantum dalam acara ListView.

1,2 Attack
-. Dapat menarik dan mengumpulkan semua paket di LAN.
-. Dapat melakukan enam menyerang tindakan sebagai berikut:
(1) Arp Flood - Send ip konflik paket ke target
komputer secepat mungkin, jika Anda mengirim terlalu banyak,
komputer target akan turun. :-(
(2) BanGateway - Beritahu gateway mac yang salah alamat komputer target, sehingga target tidak dapat menerima paket dari internet. Serangan ini adalah untuk melarang target akses internet.
(3) IPConflict - Like Arp Flood, mengirim paket ip konflik komputer target secara teratur, mungkin pengguna tidak dapat bekerja karena konflik ip reguler pesan. apa lagi, target tidak dapat mengakses lan.
(4) SniffGateway - Spoof sasaran dan gateway, anda dapat menggunakan sniffer untuk mengumpulkan paket-paket di antara mereka.
(5) SniffHosts - Spoof di antara dua atau di atas target, Anda dapat menggunakan paket sniffer untuk mengumpulkan di antara mereka semua. (berbahaya !!!!)
(6) SniffLan - Sama seperti SniffGateway, perbedaannya bahwa siaran SniffLan mengirimkan paket arp untuk memberitahu semua komputer pada lan bahwa tuan rumah ini hanya gateway, Sehingga Anda dapat mengendus semua data antara semua host dengan
gateway. (berbahaya !!!!!!!!!!!!!!)
-. Sementara tabel ARP spoofing, dapat bertindak sebagai lain
gateway (atau ip-forwarder) tanpa pengguna lain '
pengakuan di LAN.
-. Dapat mengumpulkan dan forward paket melalui
WinArpAttacker's ipforward fungsi, Anda sebaiknya memeriksa
sistem menonaktifkan fungsi ipforward karena WinArpAttacker
dapat melakukannya dengan baik.
-. Semua data mendengus oleh spoofing dan diteruskan oleh
Fungsi WinArpAttacker ipforward akan dihitung, seperti yang Anda
bisa lihat di antarmuka utama.
-. Seperti keinginan Anda, maka tabel arp pulih secara otomatis
dalam sedikit waktu (sekitar 5 detik). Anda juga dapat memilih
tidak untuk pulih.
1,3 Deteksi
-. Apa fungsi yang paling penting, dapat mendeteksi hampir semua tindakan menyerang metioned seperti di atas serta Status tuan rumah. acara WinArpAttacker dapat mendeteksi adalah terdaftar sebagai berikut:
SrcMac_Mismath - Host mengirimkan paket arp, para src_mac tidak cocok, maka paket tersebut akan diabaikan.

DstMac_Mismath - Host recv an arp paket, yang dst_mac tidak cocok, maka paket tersebut akan diabaikan.
Arp_Scan - Host adalah mengamati lan oleh permintaan arp daftar host.
Arp_Antisniff_Scan - Host adalah untuk memeriksa lan sniffing host, sehingga pemindai dapat mengetahui siapa yang menghirup.
Host_Online - Host is online now.
Host_Modify_IP - Host diubah dengan ip atau menambahkan yang baru IP.
Host_Modify_MAC - Host diubah dengan alamat mac.
New_Host - GOST Baru ditemukan.
Host_Add_IP - Host menambahkan alamat ip yang baru.
Multi_IP_Host - Host memiliki multi-ip address.
Multi_Mac_Host - Host memiliki multi-mac alamat
Attack_Flood - Host mengirimkan banyak paket arp lain tuan rumah, sehingga komputer target mungkin melambat.
Attack_Spoof - Host mengirimkan paket arp khusus untuk mengendus data dua sasaran, sehingga korban data yang terpapar.
Attack_Spoof_Lan - Host memungkinkan semua host di lan percaya bahwa itu hanya sebuah gateway, sehingga penyusup dapat mengendus semua host 'data ke gateway nyata.
Attack_Spoof_Ban_Access - Host mengatakan host yang memiliki host inexist mac, sehingga target tidak dapat berkomunikasi dengan setiap lain.
Attack_Spoof_Ban_Access_GW - Host mengatakan kepada tuan rumah bahwa gateway memiliki inexist mac, sehingga target tidak dapat mengakses internet melalui gateway.
Attack_Spoof_Ban_Access_Lan - Host broadcast host's mac sebagai inexist mac, sehingga target tidak dapat berkomunikasi dengan semua host di lan.
Attack_IP_Conflict - Host menemukan host yang lain memiliki ip yang sama sebagai, sehingga target akan terganggu oleh konflik ip pesan.
Local_Arp_Entry_Change - sekarang WinArpAttacker dapat menonton arp lokal masuk, ketika sebuah host alamat mac arp lokal meja adalah berubah, WinArpAttacker dapat melaporkan.
Local_Arp_Entry_Add - Ketika sebuah mac address dari sebuah host yang ditambahkan ke tabel arp lokal, WinArpAttacker dapat melaporkan.
-. Dapat menjelaskan setiap peristiwa yang WinArpAttacker terdeteksi.
-. Ini dapat menyimpan peristiwa ke file.
1,4 Lindungi
-. Dukungan meja arp melindungi. ketika mendeteksi WinArpAttacker lokal atau jauh dari tuan rumah sedang arp-spoofing, maka akan memulihkan lokal atau remote host's arp tabel yang Anda inginkan.
1,5 Proxy Arp
-. Ketika host pada permintaan lan host lain 'mac alamat, WinArpAttacker akan menceritakannya mac tertentu alamat yang Anda inginkan.
-. Ini bertujuan untuk mewujudkan mengakses internet tanpa mengubah ip pada lan baru, tetapi juga dapat membuat lan dalam massa besar jika Anda menetapkan alamat mac yang salah.
1,6 Simpan arp packets
-. Dapat menyimpan semua paket arp mengendus ke file.
1,7 fitur lainnya.
-. Support multi-network adapter dan multi-ip address dan multi-gateway pada komputer, Anda dapat memilih berbagai adaptor dan alamat ip untuk memindai lan yang berbeda.
-. Dukungan DHCP dan alamat ip tetap.
-. Menghitung semua paket arp untuk setiap host, termasuk mengirim dan menerima paket arp.
Arp R / S Q / P
| |
Action (Recive / Send) Arp packets type (Request / Reply)
- - - --
ArpRQ makna: Jumlah permintaan arp packets received
ArpRP makna: Jumlah arp reply packets received
ArpSQ makna: Jumlah atau permintaan arp paket yang dikirim
ArpSP makna: Jumlah atau arp reply packets sent
2. System Requirement.
------------------------------------
-. Lokal: Windows XP/2000/2003/vista semua versi
-. Remote: Semua komputer termasuk perangkat jaringan
-. Driver WinPcap harus terbaru dibutuhkan (semua siap dalam rar)
3. What's New
------------------------------------
+ Ini dapat memindai rentang ip besar untuk online host oleh mode pemindaian lanjutan.
+ Ini dapat melindungi dan lokal host dari reomte arp - spoofing.
+ Ini dapat mengaktifkan proxy arp, bertindak sebagai proxy arp.
+ Ini dapat menyelamatkan semua paket arp mengendus ke file.
4. Persiapan
------------------------------------
-. Firtly, instal driver WinPcap terbaru (Sudah di zip file)
-. kedua, jalankan LAN Attacker (Standalone tidak perluinstalasi)
-. klik tombol scan dan tombol start
-. arp lihat informasi tentang komputer jauh dengan "arp --a "
-. untuk menghentikan serangan, klik tombol stop.
-. untuk memilih adapter atau ip address, klik tombol pilihan.
-. memodifikasi menyerang setup, klik tombol pilihan.
- Jika ada banyak host aktif (lebih dari 50) dan
gateway nyata mungkin di atas LAN.

Kalau berguna ga nolak diklik thank's nya.. atau mo nambahin reputasi ane :D:D:D
kali aja bisa dapet award kaya mastah2 yg lain :D

Saturday, May 8, 2010

Instalasi Mikrotik

Proses Install

Masukkan CD yang sudah dibakar ke dalam CD Drive, lalu booting PC.

Pilihlah paket instalasi yang ingin digunakan. Proses ini berkaitan dengan lisensi RouterOS yang kamu miliki.


Tekan tombol “I” untuk melanjutkan instalasi. Kamu akan ditanya apakah akan meneruskan dengan memformat isi hard disk (hati-hati jangan sampai salah hard disk). Saat ditanya apakah akan menyimpan informasi lama, silakan dijawab tidak atau tekan tombol “N”.
Ambil snack dan minuman ringan serta tunggulah beberapa saat selama proses instalasi dilakukan.
Sudah selesai? tekan Enter untuk melakukan booting pertama kali RouterOS.

Sesaat setelah RouterOS berhasil di boot, kamu akan dihadapkan pada layar seperti gambar 6. Lakukan pengecekan sistem terhadap kemungkinan kerusakan yang terjadi, tekan tombol “Y”.
Kamu sudah selesai melalukan instalasi RouterOS.

Proses Login dan Sistem Konsol

Setelah sukses instalasi kamu sudah dapat login untuk pertama kalinya seperti terlihat pada gambar 7. Gunakan username admin dengan password kosong (tekan tombol Enter saja). Kamu wajib mengganti password dengan password-mu sendiri, gunakan perintah /password.
Paket standar Mikrotik yang sudah kamu install minimal akan berisi paket sistem (system package) saja. Termasuk dasar Routing IP dan Administrasi Router. Untuk menambah paket lainnya seperti wireless, OSPF, IP Telephony dan sebagainya silakan download terlebih dahulu paket-paketnya. Penting untuk diperhatikan adalah saat memilih paket tambahan yaitu harus sama versinya dengan RouterOS yang kamu gunakan. Jika tidak maka paket tambahan tersebut tidak dapat diinstalasi. Kita akan bahas sistem konsol dan cara navigasinya lebih lanjut pada tulisan berikutnya dari saya.

Wednesday, April 28, 2010

Install metasploit 3.2 di ubuntu 9.04

The Metasploit Framework is a penetration testing toolkit, exploit development platform, and research tool. The framework includes hundreds of working remote exploits for a variety of platforms. Payloads, encoders, and nop slide generators can be mixed and matched with exploit modules to solve almost any exploit-related task. Metasploit is written in the Ruby scripting language and is provided under the BSD license.

Penjelasan sederhananya, Metasploit adalah alat untuk test dan penetrasti keamanan baik web, aplikasi, maupun server yang ditulis dengan bahasa Ruby. Dia juga merupakan gabungan dari berbagai macam exploit.. ;-)
Metasploit versi 3.2 ini masih mendukung 3 versi, yakni versi console, GUI dan web. Jadi untuk teman-teman yang kurang bisa menggunakan versi console, bisa menggunakan versi GUI..

udah jelas kan kalau belum jelas tanyakan ke para master2 di dunia hacking atau mbah google

trus setelah kita tau tuh gimana cara install nya...nah yang ane coba ini nginstallnya di ubuntu 9.04 dekstop...kok linux..hehehe namanya aja target missionnya win XP sp2 hihihi alias yang make dial up2 dari win xp sp 2 wekkkk hari gini masih ja make server wndows..:P

ok lanjut bro.......tapi ingat bro kita mah untuk belajar ya and jadi pelajaran jangan lah lagi make win xp bajakannnnnnnnnnnn ehhehehehhehehehhehehehhehehhe

Mulai..
buka terminal (cari biasanya) lho...............
1. install paket2 ini dulu brooo
apt-get install subversion ruby libruby rdoc libyaml-ruby libzlib-ruby
apt-get install libopenssl-ruby libdl-ruby libreadline-ruby
apt-get install libiconv-ruby rubygems libgtk2-ruby libglade2-ruby

2. download Metasploit Framework

wget http://spool.metasploit.com/releases/framework-3.2.tar.gz

3. tar -zxvf framework-3.2.tar.gz

4. update svn nya apa tuh svn hehehehhehehehe cari aja dah sendiri maklum aku juga newbei

svn update

dor dor dor udah selesaii wahhh mudah kali ya....kagak nyampe 10 menti udah selesaiii
trus gimana jalanninya

aihhhh gampang kok brooo pake cd cd gitu lohh bukan Celana Dalem ya.....

cd framework-3.2
Hantu_zero:~/framework-3.2$ sudo ./msfgui

Monday, November 30, 2009

Mangle, Queue Tree and prioritization

As we know ‘simple queue’ marks packets from/to target ip and queues them using
global-in/global-out parents for packets at the local side of router. If we want
to queue services using ‘queue tree’ we can do it at the local or public side.
However if we want to use ‘simple queue’ and ‘queue tree’ for services we don’t
have that choice. Packets are marked at the local side and queued by ‘simple queue’
(we can’t see it in /ip firewall mange and /queue tree). The second marking and
the ‘queue tree’ at the local side won’t work. That’s why, for services we need
to mark packets incoming/outgoing (prerouting/postrouting) at the public side of router.

Mangle Packet Flow
-------------------
* There are 5 places to mangle
- Prerouting
- Input
- Output
- Forward
- Postrouting

* There are 4 places to limit
- Global-in
- Global-out
- Global-total
- Interface queue
- Ether1,Ether2,etc (WAN,LAN,etc)
- Wlan1,Wlan2,etc (WAN,LAN,etc)


Mangle Packet Flow Diagram
---------------------------
+---------+
+-->| Mangle |--+
| | Forward | |
| +---------+ |
| V
_________ _________
+-------------------+ / \ / \ +-------------+
| Global-in | | Routing | | Routing | | Mangle |
| (and global-total |--->| Decision | | Decision |----> | Postrouting |
+-------------------+ \_________/ \_________/ +-------------+
^ | ^ |
| V | V
+------------+ +------------+ +------------+ +------------------+
| Mangle | | Mangle | | Mangle | | Global-out |
| Prerouting | | Input | | Output | | (and global-out) |
------------+ +------------+ +------------+ +------------------+
^ | ^ |
| V | V
+============+ +=-==-==-=-=-+----+=-=-=-=-=-=-+ +============+
| INPUT | | Local |--->| Local | | OUTPUT |
| INTERFACE | | Process-In | |Process-Out | | INTERFACE |
+============+ +=-==-==-=-=-+----+=-=-=-=-=-=-+ +============+


## Configuration


/interface set ether1 name=wan
/interface set ether2 name=lan

/ip address add address=192.168.0.1/24 interface=lan
/ip address add address=1.0.0.2/24 interface=wan
/ip route add gateway=1.0.0.1

/ip firewall nat add chain=srcnat action=masquerade src-address=192.168.0.0/24

At first we make simple queue, for example:

:for z from 2 to 254 do={/queue simple add name=(0. . $z) target-addresses=(192.168.0. . $z) \
parent=192.168.0.0/24 interface=all priority=4 queue=default/default max-limit=128000/530000 \
total-queue=default}

Now we mark packets for the services

/ ip firewall mangle
add chain=prerouting action=mark-packet new-packet-mark=icmp_in passthrough=no \
in-interface=wan protocol=icmp comment="icmp" disabled=no
add chain=postrouting action=mark-packet new-packet-mark=icmp_out \
passthrough=no out-interface=wan protocol=icmp comment="" disabled=no
add chain=prerouting action=mark-packet new-packet-mark=p2p_in passthrough=no \
p2p=all-p2p in-interface=wan comment="p2p" disabled=no
add chain=postrouting action=mark-packet new-packet-mark=p2p_out \
passthrough=no p2p=all-p2p out-interface=wan comment="" disabled=no
add chain=prerouting action=mark-packet new-packet-mark=pop3_in passthrough=no \
in-interface=wan src-port=110 protocol=tcp comment="pop3" disabled=no
add chain=postrouting action=mark-packet new-packet-mark=pop3_out \
passthrough=no out-interface=wan dst-port=110 protocol=tcp comment="" \
disabled=no
add chain=prerouting action=mark-packet new-packet-mark=smtp_in passthrough=no \
in-interface=wan src-port=25 protocol=tcp comment="smtp" disabled=no
add chain=postrouting action=mark-packet new-packet-mark=smtp_out \
passthrough=no out-interface=wan dst-port=25 protocol=tcp comment="" \
disabled=no
add chain=prerouting action=mark-packet new-packet-mark=imap_in passthrough=no \
in-interface=wan src-port=143 protocol=tcp comment="imap" disabled=no
add chain=postrouting action=mark-packet new-packet-mark=imap_out \
passthrough=no out-interface=wan dst-port=143 protocol=tcp comment="" \
disabled=no
add chain=prerouting action=mark-packet new-packet-mark=ssh_in passthrough=no \
in-interface=wan dst-port=22 protocol=tcp comment="ssh" disabled=no
add chain=postrouting action=mark-packet new-packet-mark=ssh_out \
passthrough=no out-interface=wan src-port=22 protocol=tcp comment="" \
disabled=no
add chain=prerouting action=mark-packet new-packet-mark=winbox_in \
passthrough=no in-interface=wan dst-port=8291 protocol=tcp \
comment="winbox" disabled=no
add chain=postrouting action=mark-packet new-packet-mark=winbox_out \
passthrough=no out-interface=wan src-port=8291 protocol=tcp comment="" \
disabled=no
add chain=prerouting action=mark-packet new-packet-mark=dns_in passthrough=no \
in-interface=wan src-port=53 protocol=udp comment="dns" disabled=no
add chain=postrouting action=mark-packet new-packet-mark=dns_out \
passthrough=no out-interface=wan dst-port=53 protocol=udp comment="" \
disabled=no
add chain=prerouting action=mark-packet new-packet-mark=www_in passthrough=no \
in-interface=wan src-port=80 protocol=tcp comment="www" disabled=no
add chain=postrouting action=mark-packet new-packet-mark=www_out \
passthrough=no out-interface=wan dst-port=80 protocol=tcp comment="" \
disabled=no
add chain=prerouting action=mark-packet new-packet-mark=ssl_in passthrough=no \
in-interface=wan src-port=443 protocol=tcp comment="ssl" disabled=no
add chain=postrouting action=mark-packet new-packet-mark=ssl_out \
passthrough=no out-interface=wan dst-port=443 protocol=tcp comment="" \
disabled=no
add chain=prerouting action=mark-packet new-packet-mark=udp_in passthrough=no \
in-interface=wan protocol=udp comment="udp" disabled=no
add chain=postrouting action=mark-packet new-packet-mark=udp_out \
passthrough=no out-interface=wan protocol=udp comment="" disabled=no
add chain=prerouting action=mark-packet new-packet-mark=tcp_in passthrough=no \
in-interface=wan protocol=tcp comment="tcp" disabled=no
add chain=postrouting action=mark-packet new-packet-mark=tcp_out \
passthrough=no out-interface=wan protocol=tcp comment="" disabled=no
add chain=prerouting action=mark-packet new-packet-mark=other_in \
passthrough=no in-interface=wan comment="other" disabled=no
add chain=postrouting action=mark-packet new-packet-mark=other_out \
passthrough=no out-interface=wan comment="" disabled=no


after that we can make queue tree:

/queue tree
add name="upload_wan1" parent=global-out packet-mark="" limit-at=0 \
queue=wireless-default priority=4 max-limit=0 burst-limit=0 \
burst-threshold=0 burst-time=0s disabled=no
add name="icmp_down" parent=global-in packet-mark=icmp_in limit-at=0 \
queue=wireless-default priority=1 max-limit=0 burst-limit=0 \
burst-threshold=0 burst-time=0s disabled=no
add name="icmp_up" parent=global-out packet-mark=icmp_out limit-at=0 \
queue=wireless-default priority=1 max-limit=0 burst-limit=0 \
burst-threshold=0 burst-time=0s disabled=no
add name="winbox_down" parent=global-in packet-mark=winbox_in limit-at=0 \
queue=wireless-default priority=1 max-limit=0 burst-limit=0 \
burst-threshold=0 burst-time=0s disabled=no
add name="winbox_up" parent=global-out packet-mark=winbox_out limit-at=0 \
queue=wireless-default priority=1 max-limit=0 burst-limit=0 \
burst-threshold=0 burst-time=0s disabled=no
add name="dns_down" parent=global-in packet-mark=dns_in limit-at=0 \
queue=wireless-default priority=1 max-limit=0 burst-limit=0 \
burst-threshold=0 burst-time=0s disabled=no
add name="dns_up" parent=global-out packet-mark=dns_out limit-at=0 \
queue=wireless-default priority=1 max-limit=0 burst-limit=0 \
burst-threshold=0 burst-time=0s disabled=no
add name="www_up" parent=upload_wan1 packet-mark=www_out limit-at=0 \
queue=wireless-default priority=2 max-limit=0 burst-limit=0 \
burst-threshold=0 burst-time=0s disabled=no
add name="ssl_up" parent=upload_wan1 packet-mark=ssl_out limit-at=0 \
queue=wireless-default priority=1 max-limit=0 burst-limit=0 \
burst-threshold=0 burst-time=0s disabled=no
add name="p2p_up" parent=upload_wan1 packet-mark=p2p_out limit-at=0 \
queue=wireless-default priority=8 max-limit=0 burst-limit=0 \
burst-threshold=0 burst-time=0s disabled=no
add name="udp_up" parent=upload_wan1 packet-mark=udp_out limit-at=0 \
queue=wireless-default priority=6 max-limit=0 burst-limit=0 \
burst-threshold=0 burst-time=0s disabled=no
add name="tcp_up" parent=upload_wan1 packet-mark=tcp_out limit-at=0 \
queue=wireless-default priority=4 max-limit=0 burst-limit=0 \
burst-threshold=0 burst-time=0s disabled=no
add name="other_up" parent=upload_wan1 packet-mark=other_out limit-at=0 \
queue=wireless-default priority=7 max-limit=0 burst-limit=0 \
burst-threshold=0 burst-time=0s disabled=no
add name="download_wan1" parent=global-in packet-mark="" limit-at=0 \
queue=wireless-default priority=4 max-limit=0 burst-limit=0 \
burst-threshold=0 burst-time=0s disabled=no
add name="www_down" parent=download_wan1 packet-mark=www_in limit-at=0 \
queue=wireless-default priority=2 max-limit=0 burst-limit=0 \
burst-threshold=0 burst-time=0s disabled=no
add name="ssl_down" parent=download_wan1 packet-mark=ssl_in limit-at=0 \
queue=wireless-default priority=1 max-limit=0 burst-limit=0 \
burst-threshold=0 burst-time=0s disabled=no
add name="p2p_down" parent=download_wan1 packet-mark=p2p_in limit-at=0 \
queue=wireless-default priority=8 max-limit=0 burst-limit=0 \
burst-threshold=0 burst-time=0s disabled=no
add name="udp_down" parent=download_wan1 packet-mark=udp_in limit-at=0 \
queue=wireless-default priority=6 max-limit=0 burst-limit=0 \
burst-threshold=0 burst-time=0s disabled=no
add name="tcp_down" parent=download_wan1 packet-mark=tcp_in limit-at=0 \
queue=wireless-default priority=4 max-limit=0 burst-limit=0 \
burst-threshold=0 burst-time=0s disabled=no
add name="other" parent=download_wan1 packet-mark=other_in limit-at=0 \
queue=wireless-default priority=7 max-limit=0 burst-limit=0 \
burst-threshold=0 burst-time=0s disabled=no
add name="ssh_down" parent=global-in packet-mark=ssh_in limit-at=0 \
queue=wireless-default priority=1 max-limit=0 burst-limit=0 \
burst-threshold=0 burst-time=0s disabled=no
add name="ssh_up" parent=global-out packet-mark=ssh_out limit-at=0 \
queue=wireless-default priority=1 max-limit=0 burst-limit=0 \
burst-threshold=0 burst-time=0s disabled=no
add name="pop3_down" parent=download_wan1 packet-mark=pop3_in limit-at=0 \
queue=wireless-default priority=5 max-limit=0 burst-limit=0 \
burst-threshold=0 burst-time=0s disabled=no
add name="smtp_down" parent=download packet-mark=smtp_in limit-at=0 \
queue=wireless-default priority=5 max-limit=0 burst-limit=0 \
burst-threshold=0 burst-time=0s disabled=no
add name="imap_down" parent=download packet-mark=imap_in limit-at=0 \
queue=wireless-default priority=5 max-limit=0 burst-limit=0 \
burst-threshold=0 burst-time=0s disabled=no
add name="imap_up" parent=upload packet-mark=imap_out limit-at=0 \
queue=wireless-default priority=5 max-limit=0 burst-limit=0 \
burst-threshold=0 burst-time=0s disabled=no
add name="smtp_out" parent=upload packet-mark=smtp_out limit-at=0 \
queue=wireless-default priority=5 max-limit=0 burst-limit=0 \
burst-threshold=0 burst-time=0s disabled=no
add name="pop3_up" parent=upload packet-mark=pop3_out limit-at=0 \
queue=wireless-default priority=5 max-limit=0 burst-limit=0 \
burst-threshold=0 burst-time=0s disabled=no

We have several basic download/upload queues:

- wan

- icmp

- winbox

- dns

Icmp, dns and winbox have the highest priority to ensure low ping, quick answer
of dns server and winbox connection without any problems. The second is wan.
In wan tree we decide which service has the highest priority, for which one
we want to guarantee bandwidth or decrease speed.


From: http://wiki.mikrotik.com/wiki/Mangle%2C_Queue_Tree_and_prio_by_fly_man_..._almost_done


###################
# Alternatif Mangle
###################


Prioritization Plan
^ 1
DNS,SSH,ICMP,Telnet,HTTP Request,HTTPS ...... |
|
|
Game ...... |
|
|
Voip,Skype,Video Conference,VPN,MSN ...... |
|
|
Mail,HTTP Download,sFTP,FTP ....... |
|
|
P2p.........|
|
o 8

How to mark?
=========================================================================================================
Group | Priority | Service | Protocol | Dst-Port | Other Conditions
===============|===========|=====================|===========|==========|================================
P2p_services | 8 | P2p | | | p2p=all-p2p
---------------|-----------|---------------------|-----------|----------|--------------------------------
| | | TCP | 110 |
| | |-----------|----------|--------------------------------
| | | TCP | 995 |
| | |-----------|----------|--------------------------------
| | Mails | TCP | 143 |
Download_ | | |-----------|----------|--------------------------------
Services | | | TCP | 993 |
| 7 | |-----------|----------|--------------------------------
| | | TCP | 25 |
| |---------------------|-----------|----------|--------------------------------
| | HTTP downloads | TCP | 80 | Connection-bytes=500000-0
| |---------------------|-----------|----------|--------------------------------
| | FTP | TCP | 20 |
| | |-----------|----------|--------------------------------
| | | TCP | 21 |
| |---------------------|-----------|----------|--------------------------------
| | SFTP | TCP | 22 | Packet-size=1400-1500
---------------|-----------|---------------------|-----------|----------|--------------------------------
| | DNS | TCP | 53 |
| | |-----------|----------|--------------------------------
| | | UDP | 53 |
| |---------------------|-----------|----------|--------------------------------
Ensign_services| | ICMP | ICMP | - |
| 1 |---------------------|-----------|----------|--------------------------------
| | HTTPS | TCP | 443 |
| |---------------------|-----------|----------|--------------------------------
| | Telnet | TCP | 23 |
| |---------------------|-----------|----------|--------------------------------
| | SSH | TCP | 22 |
| |---------------------|-----------|----------|--------------------------------
| | HTTP request | TCP | 80 | Connection-bytes=0-500000
---------------|-----------|---------------------|-----------|----------|--------------------------------
User_request | 3 | Online game servers | | | Dst-address-list=user_request
---------------|-----------|---------------------|-----------|----------|--------------------------------
Communication_ | | VoIP | | |
services | |---------------------|-----------|----------|--------------------------------
| | Skype | | |
| 5 |---------------------|-----------|----------|--------------------------------
| | Video conference | | |
| |---------------------|-----------|----------|--------------------------------
| | VPN | | |
| |---------------------|-----------|----------|--------------------------------
| | MSN | | |
---------------|-----------|---------------------|-----------|----------|--------------------------------
Source: MUM USA 2008, IL, Workshop Mikrotik, QoS Best Pracktice

Create packet marks in the mangle chain “Prerouting” for traffic prioritization in the global-in queue

o Ensign_services (Priority=1)
o User_requests (Priority=3)
o Communication_services (Priority=5)
o Download_services (Priority=7)
o P2P_services (Priority=8)


/ ip firewall mangle
add action=mark-connection chain=prerouting comment="Prio P2P" disabled=no \
new-connection-mark=prio_conn_p2p p2p=all-p2p passthrough=yes
add action=mark-packet chain=prerouting comment="" \
connection-mark=prio_conn_p2p disabled=no new-packet-mark=prio_p2p_packet \
passthrough=no
add action=mark-connection chain=prerouting comment="Prio Download_Services" \
disabled=no dst-port=110 new-connection-mark=prio_conn_download_services \
passthrough=yes protocol=tcp
add action=mark-connection chain=prerouting comment="" disabled=no \
dst-port=995 new-connection-mark=prio_conn_download_services \
passthrough=yes protocol=tcp
add action=mark-connection chain=prerouting comment="" disabled=no \
dst-port=143 new-connection-mark=prio_conn_download_services \
passthrough=yes protocol=tcp
add action=mark-connection chain=prerouting comment="" disabled=no \
dst-port=993 new-connection-mark=prio_conn_download_services \
passthrough=yes protocol=tcp
add action=mark-connection chain=prerouting comment="" disabled=no \
dst-port=995 new-connection-mark=prio_conn_download_services \
passthrough=yes protocol=tcp
add action=mark-connection chain=prerouting comment="" disabled=no dst-port=25 \
new-connection-mark=prio_conn_download_services passthrough=yes \
protocol=tcp
add action=mark-connection chain=prerouting comment="" \
connection-bytes=500000-0 disabled=no dst-port=80 \
new-connection-mark=prio_conn_download_services passthrough=yes \
protocol=tcp
add action=mark-connection chain=prerouting comment="" disabled=no \
dst-port=20-21 new-connection-mark=prio_conn_download_services \
passthrough=yes protocol=tcp
add action=mark-connection chain=prerouting comment="" disabled=no dst-port=22 \
new-connection-mark=prio_conn_download_services packet-size=1400-1500 \
passthrough=yes protocol=tcp
add action=mark-packet chain=prerouting comment="" \
connection-mark=prio_conn_download_services disabled=no \
new-packet-mark=prio_download_packet passthrough=yes
add action=mark-connection chain=prerouting comment="Prio Ensign_Services" \
disabled=no dst-port=53 new-connection-mark=prio_conn_ensign_services \
passthrough=yes protocol=tcp
add action=mark-connection chain=prerouting comment="" disabled=no dst-port=53 \
new-connection-mark=prio_conn_ensign_services passthrough=yes protocol=udp
add action=mark-connection chain=prerouting comment="" disabled=no \
new-connection-mark=prio_conn_ensign_services passthrough=yes \
protocol=icmp
add action=mark-connection chain=prerouting comment="" disabled=no \
dst-port=443 new-connection-mark=prio_conn_ensign_services passthrough=yes \
protocol=tcp
add action=mark-connection chain=prerouting comment="" disabled=no dst-port=23 \
new-connection-mark=prio_conn_ensign_services passthrough=yes protocol=tcp
add action=mark-connection chain=prerouting comment="" \
connection-bytes=0-500000 disabled=no dst-port=80 \
new-connection-mark=prio_conn_ensign_services passthrough=yes protocol=tcp
add action=mark-connection chain=prerouting comment="" disabled=no \
dst-port=179 new-connection-mark=prio_conn_ensign_services passthrough=yes \
protocol=tcp
add action=mark-connection chain=prerouting comment="" disabled=no \
dst-port=8000 new-connection-mark=prio_conn_ensign_services \
passthrough=yes protocol=tcp
add action=mark-packet chain=prerouting comment="" \
connection-mark=prio_conn_ensign_services disabled=no \
new-packet-mark=prio_ensign_packet passthrough=no
add action=mark-connection chain=prerouting comment="Prio User_Request" \
disabled=no dst-port=22 new-connection-mark=prio_conn_ensign_services \
packet-size=1400-1500 passthrough=yes protocol=tcp
add action=mark-connection chain=prerouting comment="" disabled=no \
dst-address-list=user_request new-connection-mark=prio_conn_user_services \
passthrough=yes
add action=mark-packet chain=prerouting comment="" \
connection-mark=prio_conn_user_services disabled=no \
new-packet-mark=prio_request_packet passthrough=yes
add action=mark-connection chain=prerouting comment="" disabled=no \
new-connection-mark=prio_conn_comm_services passthrough=yes protocol=gre
add action=mark-connection chain=prerouting comment="Prio_Communication" \
disabled=no dst-port=5100 new-connection-mark=prio_conn_comm_services \
passthrough=yes protocol=tcp
add action=mark-connection chain=prerouting comment="" disabled=no \
dst-port=5050 new-connection-mark=prio_conn_comm_services passthrough=yes \
protocol=tcp
add action=mark-connection chain=prerouting comment="" disabled=no \
dst-port=5060 new-connection-mark=prio_conn_comm_services passthrough=yes \
protocol=udp
add action=mark-connection chain=prerouting comment="" disabled=no \
dst-port=1869 new-connection-mark=prio_conn_comm_services passthrough=yes \
protocol=tcp
add action=mark-connection chain=prerouting comment="" disabled=no \
dst-port=1723 new-connection-mark=prio_conn_comm_services passthrough=yes \
protocol=tcp
add action=mark-connection chain=prerouting comment="" disabled=no \
dst-port=5190 new-connection-mark=prio_conn_comm_services passthrough=yes \
protocol=tcp
add action=mark-connection chain=prerouting comment="" disabled=no \
dst-port=6660-7000 new-connection-mark=prio_conn_comm_services \
passthrough=yes protocol=tcp
add action=mark-connection chain=prerouting comment="" disabled=no \
new-connection-mark=prio_conn_comm_services passthrough=yes \
protocol=ipencap
add action=mark-connection chain=prerouting comment="" disabled=no \
new-connection-mark=prio_conn_comm_services passthrough=yes \
protocol=ipsec-esp
add action=mark-connection chain=prerouting comment="" disabled=no \
new-connection-mark=prio_conn_comm_services passthrough=yes \
protocol=ipsec-ah
add action=mark-connection chain=prerouting comment="" disabled=no \
new-connection-mark=prio_conn_comm_services passthrough=yes protocol=ipip
add action=mark-connection chain=prerouting comment="" disabled=no \
new-connection-mark=prio_conn_comm_services passthrough=yes protocol=encap
add action=mark-packet chain=prerouting comment="" \
connection-mark=prio_conn_comm_services disabled=no \
new-packet-mark=prio_comm_packet passthrough=no


Queue TRee

/queue tree
add burst-limit=0 burst-threshold=0 burst-time=0s disabled=no limit-at=0 \
max-limit=0 name="Priorization" packet-mark="" parent=global-in priority=1 \
queue=default
add burst-limit=0 burst-threshold=0 burst-time=0s disabled=no limit-at=0 \
max-limit=0 name="Communication_Services_Prio3" \
packet-mark=prio_comm_packet parent=Priorization priority=3 queue=default
add burst-limit=0 burst-threshold=0 burst-time=0s disabled=no limit-at=0 \
max-limit=0 name="Download_Services_Prio5" \
packet-mark=prio_download_packet parent=Priorization priority=5 \
queue=default
add burst-limit=0 burst-threshold=0 burst-time=0s disabled=no limit-at=0 \
max-limit=0 name="Ensign_Services_Prio1" packet-mark=prio_ensign_packet \
parent=Priorization priority=1 queue=default
add burst-limit=0 burst-threshold=0 burst-time=0s disabled=no limit-at=0 \
max-limit=0 name="P2P_Traffic_Prio8" packet-mark=prio_p2p_packet \
parent=Priorization priority=8 queue=default
add burst-limit=0 burst-threshold=0 burst-time=0s disabled=no limit-at=0 \
max-limit=0 name="User_Request_Prio8" packet-mark=prio_request_packet \
parent=Priorization priority=8 queue=default