Wednesday, December 2, 2009

Tips remove Virus OnlineGames

For the you don't wish the important data lose is and or stolen better virus infection don't OnlineGames. Avoid to execute and installation [at] program and software which unknown to
Besides to be remembered, beware of [at] online forum in internet providing link-link the compromisingness or you don't believe his authenticity.

Special for company with computer in the network many, you do filter IP-IP the compromisingness. Result of filtering use NNP done [at] traffic ISP confirm that W32/OnlineGames is real threat to be taken heed in this time.
But, if have have come too far unintentionally the infection trojan this, will you do not willing to have to a little a few to clean the virus OnlineGames, before important data you is stolen by trojan this. Following stages;steps to fight against it:
1. Kill System Restore ( XP/ME) ( at the (time) of used)
2. Kill the virus process. Use Windows Task Manager to kill the virus process.
3. Do End Process [at] active virus file ( liser.exe)
4. Vanish string registry which have been made by the virus. To water down can use script registry hereunder.
[Version]
Signature="$Chicago$"
Provider=Vaksincom Oeyy

[DefaultInstall]
AddReg=UnhookRegKey
DelReg=del

[UnhookRegKey]
HKLM, Software\CLASSES\batfile\shell\open\command,,,"""%1"" %*"
HKLM, Software\CLASSES\comfile\shell\open\command,,,"""%1"" %*"
HKLM, Software\CLASSES\exefile\shell\open\command,,,"""%1"" %*"
HKLM, Software\CLASSES\piffile\shell\open\command,,,"""%1"" %*"
HKLM, Software\CLASSES\regfile\shell\open\command,,,"regedit.exe ""%1"""
HKLM, Software\CLASSES\scrfile\shell\open\command,,,"""%1"" %*"
HKLM, SOFTWARE\Microsoft\Windows NT\CurrentVersion\Windows, AppInit_DLLs, 0

[del]
HKCU, Software\Microsoft\Windows\CurrentVersion\Run, Kell

Use notepad, then keep by the name of Repair.inf ( use the choice Save As Type become All Files in order not to happened mistake).
5. Vanish the virus file ( liser.exe & liser.dll) manually, that is [at] folder " C:\Program Files\Manson" or can use tools Norman Malware Cleaner. you can mendownload [at] link following http://normanasa.vo.llnwd.net/o29/public/Norman_Malware_Cleaner.exe

Monday, November 30, 2009

Mangle, Queue Tree and prioritization

As we know ‘simple queue’ marks packets from/to target ip and queues them using
global-in/global-out parents for packets at the local side of router. If we want
to queue services using ‘queue tree’ we can do it at the local or public side.
However if we want to use ‘simple queue’ and ‘queue tree’ for services we don’t
have that choice. Packets are marked at the local side and queued by ‘simple queue’
(we can’t see it in /ip firewall mange and /queue tree). The second marking and
the ‘queue tree’ at the local side won’t work. That’s why, for services we need
to mark packets incoming/outgoing (prerouting/postrouting) at the public side of router.

Mangle Packet Flow
-------------------
* There are 5 places to mangle
- Prerouting
- Input
- Output
- Forward
- Postrouting

* There are 4 places to limit
- Global-in
- Global-out
- Global-total
- Interface queue
- Ether1,Ether2,etc (WAN,LAN,etc)
- Wlan1,Wlan2,etc (WAN,LAN,etc)


Mangle Packet Flow Diagram
---------------------------
+---------+
+-->| Mangle |--+
| | Forward | |
| +---------+ |
| V
_________ _________
+-------------------+ / \ / \ +-------------+
| Global-in | | Routing | | Routing | | Mangle |
| (and global-total |--->| Decision | | Decision |----> | Postrouting |
+-------------------+ \_________/ \_________/ +-------------+
^ | ^ |
| V | V
+------------+ +------------+ +------------+ +------------------+
| Mangle | | Mangle | | Mangle | | Global-out |
| Prerouting | | Input | | Output | | (and global-out) |
------------+ +------------+ +------------+ +------------------+
^ | ^ |
| V | V
+============+ +=-==-==-=-=-+----+=-=-=-=-=-=-+ +============+
| INPUT | | Local |--->| Local | | OUTPUT |
| INTERFACE | | Process-In | |Process-Out | | INTERFACE |
+============+ +=-==-==-=-=-+----+=-=-=-=-=-=-+ +============+


## Configuration


/interface set ether1 name=wan
/interface set ether2 name=lan

/ip address add address=192.168.0.1/24 interface=lan
/ip address add address=1.0.0.2/24 interface=wan
/ip route add gateway=1.0.0.1

/ip firewall nat add chain=srcnat action=masquerade src-address=192.168.0.0/24

At first we make simple queue, for example:

:for z from 2 to 254 do={/queue simple add name=(0. . $z) target-addresses=(192.168.0. . $z) \
parent=192.168.0.0/24 interface=all priority=4 queue=default/default max-limit=128000/530000 \
total-queue=default}

Now we mark packets for the services

/ ip firewall mangle
add chain=prerouting action=mark-packet new-packet-mark=icmp_in passthrough=no \
in-interface=wan protocol=icmp comment="icmp" disabled=no
add chain=postrouting action=mark-packet new-packet-mark=icmp_out \
passthrough=no out-interface=wan protocol=icmp comment="" disabled=no
add chain=prerouting action=mark-packet new-packet-mark=p2p_in passthrough=no \
p2p=all-p2p in-interface=wan comment="p2p" disabled=no
add chain=postrouting action=mark-packet new-packet-mark=p2p_out \
passthrough=no p2p=all-p2p out-interface=wan comment="" disabled=no
add chain=prerouting action=mark-packet new-packet-mark=pop3_in passthrough=no \
in-interface=wan src-port=110 protocol=tcp comment="pop3" disabled=no
add chain=postrouting action=mark-packet new-packet-mark=pop3_out \
passthrough=no out-interface=wan dst-port=110 protocol=tcp comment="" \
disabled=no
add chain=prerouting action=mark-packet new-packet-mark=smtp_in passthrough=no \
in-interface=wan src-port=25 protocol=tcp comment="smtp" disabled=no
add chain=postrouting action=mark-packet new-packet-mark=smtp_out \
passthrough=no out-interface=wan dst-port=25 protocol=tcp comment="" \
disabled=no
add chain=prerouting action=mark-packet new-packet-mark=imap_in passthrough=no \
in-interface=wan src-port=143 protocol=tcp comment="imap" disabled=no
add chain=postrouting action=mark-packet new-packet-mark=imap_out \
passthrough=no out-interface=wan dst-port=143 protocol=tcp comment="" \
disabled=no
add chain=prerouting action=mark-packet new-packet-mark=ssh_in passthrough=no \
in-interface=wan dst-port=22 protocol=tcp comment="ssh" disabled=no
add chain=postrouting action=mark-packet new-packet-mark=ssh_out \
passthrough=no out-interface=wan src-port=22 protocol=tcp comment="" \
disabled=no
add chain=prerouting action=mark-packet new-packet-mark=winbox_in \
passthrough=no in-interface=wan dst-port=8291 protocol=tcp \
comment="winbox" disabled=no
add chain=postrouting action=mark-packet new-packet-mark=winbox_out \
passthrough=no out-interface=wan src-port=8291 protocol=tcp comment="" \
disabled=no
add chain=prerouting action=mark-packet new-packet-mark=dns_in passthrough=no \
in-interface=wan src-port=53 protocol=udp comment="dns" disabled=no
add chain=postrouting action=mark-packet new-packet-mark=dns_out \
passthrough=no out-interface=wan dst-port=53 protocol=udp comment="" \
disabled=no
add chain=prerouting action=mark-packet new-packet-mark=www_in passthrough=no \
in-interface=wan src-port=80 protocol=tcp comment="www" disabled=no
add chain=postrouting action=mark-packet new-packet-mark=www_out \
passthrough=no out-interface=wan dst-port=80 protocol=tcp comment="" \
disabled=no
add chain=prerouting action=mark-packet new-packet-mark=ssl_in passthrough=no \
in-interface=wan src-port=443 protocol=tcp comment="ssl" disabled=no
add chain=postrouting action=mark-packet new-packet-mark=ssl_out \
passthrough=no out-interface=wan dst-port=443 protocol=tcp comment="" \
disabled=no
add chain=prerouting action=mark-packet new-packet-mark=udp_in passthrough=no \
in-interface=wan protocol=udp comment="udp" disabled=no
add chain=postrouting action=mark-packet new-packet-mark=udp_out \
passthrough=no out-interface=wan protocol=udp comment="" disabled=no
add chain=prerouting action=mark-packet new-packet-mark=tcp_in passthrough=no \
in-interface=wan protocol=tcp comment="tcp" disabled=no
add chain=postrouting action=mark-packet new-packet-mark=tcp_out \
passthrough=no out-interface=wan protocol=tcp comment="" disabled=no
add chain=prerouting action=mark-packet new-packet-mark=other_in \
passthrough=no in-interface=wan comment="other" disabled=no
add chain=postrouting action=mark-packet new-packet-mark=other_out \
passthrough=no out-interface=wan comment="" disabled=no


after that we can make queue tree:

/queue tree
add name="upload_wan1" parent=global-out packet-mark="" limit-at=0 \
queue=wireless-default priority=4 max-limit=0 burst-limit=0 \
burst-threshold=0 burst-time=0s disabled=no
add name="icmp_down" parent=global-in packet-mark=icmp_in limit-at=0 \
queue=wireless-default priority=1 max-limit=0 burst-limit=0 \
burst-threshold=0 burst-time=0s disabled=no
add name="icmp_up" parent=global-out packet-mark=icmp_out limit-at=0 \
queue=wireless-default priority=1 max-limit=0 burst-limit=0 \
burst-threshold=0 burst-time=0s disabled=no
add name="winbox_down" parent=global-in packet-mark=winbox_in limit-at=0 \
queue=wireless-default priority=1 max-limit=0 burst-limit=0 \
burst-threshold=0 burst-time=0s disabled=no
add name="winbox_up" parent=global-out packet-mark=winbox_out limit-at=0 \
queue=wireless-default priority=1 max-limit=0 burst-limit=0 \
burst-threshold=0 burst-time=0s disabled=no
add name="dns_down" parent=global-in packet-mark=dns_in limit-at=0 \
queue=wireless-default priority=1 max-limit=0 burst-limit=0 \
burst-threshold=0 burst-time=0s disabled=no
add name="dns_up" parent=global-out packet-mark=dns_out limit-at=0 \
queue=wireless-default priority=1 max-limit=0 burst-limit=0 \
burst-threshold=0 burst-time=0s disabled=no
add name="www_up" parent=upload_wan1 packet-mark=www_out limit-at=0 \
queue=wireless-default priority=2 max-limit=0 burst-limit=0 \
burst-threshold=0 burst-time=0s disabled=no
add name="ssl_up" parent=upload_wan1 packet-mark=ssl_out limit-at=0 \
queue=wireless-default priority=1 max-limit=0 burst-limit=0 \
burst-threshold=0 burst-time=0s disabled=no
add name="p2p_up" parent=upload_wan1 packet-mark=p2p_out limit-at=0 \
queue=wireless-default priority=8 max-limit=0 burst-limit=0 \
burst-threshold=0 burst-time=0s disabled=no
add name="udp_up" parent=upload_wan1 packet-mark=udp_out limit-at=0 \
queue=wireless-default priority=6 max-limit=0 burst-limit=0 \
burst-threshold=0 burst-time=0s disabled=no
add name="tcp_up" parent=upload_wan1 packet-mark=tcp_out limit-at=0 \
queue=wireless-default priority=4 max-limit=0 burst-limit=0 \
burst-threshold=0 burst-time=0s disabled=no
add name="other_up" parent=upload_wan1 packet-mark=other_out limit-at=0 \
queue=wireless-default priority=7 max-limit=0 burst-limit=0 \
burst-threshold=0 burst-time=0s disabled=no
add name="download_wan1" parent=global-in packet-mark="" limit-at=0 \
queue=wireless-default priority=4 max-limit=0 burst-limit=0 \
burst-threshold=0 burst-time=0s disabled=no
add name="www_down" parent=download_wan1 packet-mark=www_in limit-at=0 \
queue=wireless-default priority=2 max-limit=0 burst-limit=0 \
burst-threshold=0 burst-time=0s disabled=no
add name="ssl_down" parent=download_wan1 packet-mark=ssl_in limit-at=0 \
queue=wireless-default priority=1 max-limit=0 burst-limit=0 \
burst-threshold=0 burst-time=0s disabled=no
add name="p2p_down" parent=download_wan1 packet-mark=p2p_in limit-at=0 \
queue=wireless-default priority=8 max-limit=0 burst-limit=0 \
burst-threshold=0 burst-time=0s disabled=no
add name="udp_down" parent=download_wan1 packet-mark=udp_in limit-at=0 \
queue=wireless-default priority=6 max-limit=0 burst-limit=0 \
burst-threshold=0 burst-time=0s disabled=no
add name="tcp_down" parent=download_wan1 packet-mark=tcp_in limit-at=0 \
queue=wireless-default priority=4 max-limit=0 burst-limit=0 \
burst-threshold=0 burst-time=0s disabled=no
add name="other" parent=download_wan1 packet-mark=other_in limit-at=0 \
queue=wireless-default priority=7 max-limit=0 burst-limit=0 \
burst-threshold=0 burst-time=0s disabled=no
add name="ssh_down" parent=global-in packet-mark=ssh_in limit-at=0 \
queue=wireless-default priority=1 max-limit=0 burst-limit=0 \
burst-threshold=0 burst-time=0s disabled=no
add name="ssh_up" parent=global-out packet-mark=ssh_out limit-at=0 \
queue=wireless-default priority=1 max-limit=0 burst-limit=0 \
burst-threshold=0 burst-time=0s disabled=no
add name="pop3_down" parent=download_wan1 packet-mark=pop3_in limit-at=0 \
queue=wireless-default priority=5 max-limit=0 burst-limit=0 \
burst-threshold=0 burst-time=0s disabled=no
add name="smtp_down" parent=download packet-mark=smtp_in limit-at=0 \
queue=wireless-default priority=5 max-limit=0 burst-limit=0 \
burst-threshold=0 burst-time=0s disabled=no
add name="imap_down" parent=download packet-mark=imap_in limit-at=0 \
queue=wireless-default priority=5 max-limit=0 burst-limit=0 \
burst-threshold=0 burst-time=0s disabled=no
add name="imap_up" parent=upload packet-mark=imap_out limit-at=0 \
queue=wireless-default priority=5 max-limit=0 burst-limit=0 \
burst-threshold=0 burst-time=0s disabled=no
add name="smtp_out" parent=upload packet-mark=smtp_out limit-at=0 \
queue=wireless-default priority=5 max-limit=0 burst-limit=0 \
burst-threshold=0 burst-time=0s disabled=no
add name="pop3_up" parent=upload packet-mark=pop3_out limit-at=0 \
queue=wireless-default priority=5 max-limit=0 burst-limit=0 \
burst-threshold=0 burst-time=0s disabled=no

We have several basic download/upload queues:

- wan

- icmp

- winbox

- dns

Icmp, dns and winbox have the highest priority to ensure low ping, quick answer
of dns server and winbox connection without any problems. The second is wan.
In wan tree we decide which service has the highest priority, for which one
we want to guarantee bandwidth or decrease speed.


From: http://wiki.mikrotik.com/wiki/Mangle%2C_Queue_Tree_and_prio_by_fly_man_..._almost_done


###################
# Alternatif Mangle
###################


Prioritization Plan
^ 1
DNS,SSH,ICMP,Telnet,HTTP Request,HTTPS ...... |
|
|
Game ...... |
|
|
Voip,Skype,Video Conference,VPN,MSN ...... |
|
|
Mail,HTTP Download,sFTP,FTP ....... |
|
|
P2p.........|
|
o 8

How to mark?
=========================================================================================================
Group | Priority | Service | Protocol | Dst-Port | Other Conditions
===============|===========|=====================|===========|==========|================================
P2p_services | 8 | P2p | | | p2p=all-p2p
---------------|-----------|---------------------|-----------|----------|--------------------------------
| | | TCP | 110 |
| | |-----------|----------|--------------------------------
| | | TCP | 995 |
| | |-----------|----------|--------------------------------
| | Mails | TCP | 143 |
Download_ | | |-----------|----------|--------------------------------
Services | | | TCP | 993 |
| 7 | |-----------|----------|--------------------------------
| | | TCP | 25 |
| |---------------------|-----------|----------|--------------------------------
| | HTTP downloads | TCP | 80 | Connection-bytes=500000-0
| |---------------------|-----------|----------|--------------------------------
| | FTP | TCP | 20 |
| | |-----------|----------|--------------------------------
| | | TCP | 21 |
| |---------------------|-----------|----------|--------------------------------
| | SFTP | TCP | 22 | Packet-size=1400-1500
---------------|-----------|---------------------|-----------|----------|--------------------------------
| | DNS | TCP | 53 |
| | |-----------|----------|--------------------------------
| | | UDP | 53 |
| |---------------------|-----------|----------|--------------------------------
Ensign_services| | ICMP | ICMP | - |
| 1 |---------------------|-----------|----------|--------------------------------
| | HTTPS | TCP | 443 |
| |---------------------|-----------|----------|--------------------------------
| | Telnet | TCP | 23 |
| |---------------------|-----------|----------|--------------------------------
| | SSH | TCP | 22 |
| |---------------------|-----------|----------|--------------------------------
| | HTTP request | TCP | 80 | Connection-bytes=0-500000
---------------|-----------|---------------------|-----------|----------|--------------------------------
User_request | 3 | Online game servers | | | Dst-address-list=user_request
---------------|-----------|---------------------|-----------|----------|--------------------------------
Communication_ | | VoIP | | |
services | |---------------------|-----------|----------|--------------------------------
| | Skype | | |
| 5 |---------------------|-----------|----------|--------------------------------
| | Video conference | | |
| |---------------------|-----------|----------|--------------------------------
| | VPN | | |
| |---------------------|-----------|----------|--------------------------------
| | MSN | | |
---------------|-----------|---------------------|-----------|----------|--------------------------------
Source: MUM USA 2008, IL, Workshop Mikrotik, QoS Best Pracktice

Create packet marks in the mangle chain “Prerouting” for traffic prioritization in the global-in queue

o Ensign_services (Priority=1)
o User_requests (Priority=3)
o Communication_services (Priority=5)
o Download_services (Priority=7)
o P2P_services (Priority=8)


/ ip firewall mangle
add action=mark-connection chain=prerouting comment="Prio P2P" disabled=no \
new-connection-mark=prio_conn_p2p p2p=all-p2p passthrough=yes
add action=mark-packet chain=prerouting comment="" \
connection-mark=prio_conn_p2p disabled=no new-packet-mark=prio_p2p_packet \
passthrough=no
add action=mark-connection chain=prerouting comment="Prio Download_Services" \
disabled=no dst-port=110 new-connection-mark=prio_conn_download_services \
passthrough=yes protocol=tcp
add action=mark-connection chain=prerouting comment="" disabled=no \
dst-port=995 new-connection-mark=prio_conn_download_services \
passthrough=yes protocol=tcp
add action=mark-connection chain=prerouting comment="" disabled=no \
dst-port=143 new-connection-mark=prio_conn_download_services \
passthrough=yes protocol=tcp
add action=mark-connection chain=prerouting comment="" disabled=no \
dst-port=993 new-connection-mark=prio_conn_download_services \
passthrough=yes protocol=tcp
add action=mark-connection chain=prerouting comment="" disabled=no \
dst-port=995 new-connection-mark=prio_conn_download_services \
passthrough=yes protocol=tcp
add action=mark-connection chain=prerouting comment="" disabled=no dst-port=25 \
new-connection-mark=prio_conn_download_services passthrough=yes \
protocol=tcp
add action=mark-connection chain=prerouting comment="" \
connection-bytes=500000-0 disabled=no dst-port=80 \
new-connection-mark=prio_conn_download_services passthrough=yes \
protocol=tcp
add action=mark-connection chain=prerouting comment="" disabled=no \
dst-port=20-21 new-connection-mark=prio_conn_download_services \
passthrough=yes protocol=tcp
add action=mark-connection chain=prerouting comment="" disabled=no dst-port=22 \
new-connection-mark=prio_conn_download_services packet-size=1400-1500 \
passthrough=yes protocol=tcp
add action=mark-packet chain=prerouting comment="" \
connection-mark=prio_conn_download_services disabled=no \
new-packet-mark=prio_download_packet passthrough=yes
add action=mark-connection chain=prerouting comment="Prio Ensign_Services" \
disabled=no dst-port=53 new-connection-mark=prio_conn_ensign_services \
passthrough=yes protocol=tcp
add action=mark-connection chain=prerouting comment="" disabled=no dst-port=53 \
new-connection-mark=prio_conn_ensign_services passthrough=yes protocol=udp
add action=mark-connection chain=prerouting comment="" disabled=no \
new-connection-mark=prio_conn_ensign_services passthrough=yes \
protocol=icmp
add action=mark-connection chain=prerouting comment="" disabled=no \
dst-port=443 new-connection-mark=prio_conn_ensign_services passthrough=yes \
protocol=tcp
add action=mark-connection chain=prerouting comment="" disabled=no dst-port=23 \
new-connection-mark=prio_conn_ensign_services passthrough=yes protocol=tcp
add action=mark-connection chain=prerouting comment="" \
connection-bytes=0-500000 disabled=no dst-port=80 \
new-connection-mark=prio_conn_ensign_services passthrough=yes protocol=tcp
add action=mark-connection chain=prerouting comment="" disabled=no \
dst-port=179 new-connection-mark=prio_conn_ensign_services passthrough=yes \
protocol=tcp
add action=mark-connection chain=prerouting comment="" disabled=no \
dst-port=8000 new-connection-mark=prio_conn_ensign_services \
passthrough=yes protocol=tcp
add action=mark-packet chain=prerouting comment="" \
connection-mark=prio_conn_ensign_services disabled=no \
new-packet-mark=prio_ensign_packet passthrough=no
add action=mark-connection chain=prerouting comment="Prio User_Request" \
disabled=no dst-port=22 new-connection-mark=prio_conn_ensign_services \
packet-size=1400-1500 passthrough=yes protocol=tcp
add action=mark-connection chain=prerouting comment="" disabled=no \
dst-address-list=user_request new-connection-mark=prio_conn_user_services \
passthrough=yes
add action=mark-packet chain=prerouting comment="" \
connection-mark=prio_conn_user_services disabled=no \
new-packet-mark=prio_request_packet passthrough=yes
add action=mark-connection chain=prerouting comment="" disabled=no \
new-connection-mark=prio_conn_comm_services passthrough=yes protocol=gre
add action=mark-connection chain=prerouting comment="Prio_Communication" \
disabled=no dst-port=5100 new-connection-mark=prio_conn_comm_services \
passthrough=yes protocol=tcp
add action=mark-connection chain=prerouting comment="" disabled=no \
dst-port=5050 new-connection-mark=prio_conn_comm_services passthrough=yes \
protocol=tcp
add action=mark-connection chain=prerouting comment="" disabled=no \
dst-port=5060 new-connection-mark=prio_conn_comm_services passthrough=yes \
protocol=udp
add action=mark-connection chain=prerouting comment="" disabled=no \
dst-port=1869 new-connection-mark=prio_conn_comm_services passthrough=yes \
protocol=tcp
add action=mark-connection chain=prerouting comment="" disabled=no \
dst-port=1723 new-connection-mark=prio_conn_comm_services passthrough=yes \
protocol=tcp
add action=mark-connection chain=prerouting comment="" disabled=no \
dst-port=5190 new-connection-mark=prio_conn_comm_services passthrough=yes \
protocol=tcp
add action=mark-connection chain=prerouting comment="" disabled=no \
dst-port=6660-7000 new-connection-mark=prio_conn_comm_services \
passthrough=yes protocol=tcp
add action=mark-connection chain=prerouting comment="" disabled=no \
new-connection-mark=prio_conn_comm_services passthrough=yes \
protocol=ipencap
add action=mark-connection chain=prerouting comment="" disabled=no \
new-connection-mark=prio_conn_comm_services passthrough=yes \
protocol=ipsec-esp
add action=mark-connection chain=prerouting comment="" disabled=no \
new-connection-mark=prio_conn_comm_services passthrough=yes \
protocol=ipsec-ah
add action=mark-connection chain=prerouting comment="" disabled=no \
new-connection-mark=prio_conn_comm_services passthrough=yes protocol=ipip
add action=mark-connection chain=prerouting comment="" disabled=no \
new-connection-mark=prio_conn_comm_services passthrough=yes protocol=encap
add action=mark-packet chain=prerouting comment="" \
connection-mark=prio_conn_comm_services disabled=no \
new-packet-mark=prio_comm_packet passthrough=no


Queue TRee

/queue tree
add burst-limit=0 burst-threshold=0 burst-time=0s disabled=no limit-at=0 \
max-limit=0 name="Priorization" packet-mark="" parent=global-in priority=1 \
queue=default
add burst-limit=0 burst-threshold=0 burst-time=0s disabled=no limit-at=0 \
max-limit=0 name="Communication_Services_Prio3" \
packet-mark=prio_comm_packet parent=Priorization priority=3 queue=default
add burst-limit=0 burst-threshold=0 burst-time=0s disabled=no limit-at=0 \
max-limit=0 name="Download_Services_Prio5" \
packet-mark=prio_download_packet parent=Priorization priority=5 \
queue=default
add burst-limit=0 burst-threshold=0 burst-time=0s disabled=no limit-at=0 \
max-limit=0 name="Ensign_Services_Prio1" packet-mark=prio_ensign_packet \
parent=Priorization priority=1 queue=default
add burst-limit=0 burst-threshold=0 burst-time=0s disabled=no limit-at=0 \
max-limit=0 name="P2P_Traffic_Prio8" packet-mark=prio_p2p_packet \
parent=Priorization priority=8 queue=default
add burst-limit=0 burst-threshold=0 burst-time=0s disabled=no limit-at=0 \
max-limit=0 name="User_Request_Prio8" packet-mark=prio_request_packet \
parent=Priorization priority=8 queue=default

Thursday, November 19, 2009

tutorial setting router warnet untuk linux.

Saya menulis ini buat temen2 yang minta untuk di buatin tutorial untuk setting router warnet,dimana sebelumnya mereka memakai router windows dan mau migrasi ke linux.


|eth0
|
|-------|
| MGW |
|---|---|
|
|eth1
|
|--------------------hub----------------------|
| | |
| | |
| | |
|---------| |---------| |---------|
|Client 01| |Client 02| |Client 03|
|---------| |---------| |---------|

Pertama yang harus di lakukan adalah mensetting mgw(main gateway)
supaya bisa connect ke internet
Sebelum Mensetting :

1.Minta IP public ke ISP lengkap dengan netmask,broadcast dan dns nya
misalnya :
RANGE : 202.159.121.0/29
IP : 202.159.121.2
GATEWAY : 202.159.121.1
Nemast : 255.255.255.248
broadcast : 202.159.121.7
DNS1 : 202.159.0.10
DNS2 : 202.159.0.20
berarti kita mendapatkan ip 5 buah dari 202.159.121.2 - 202.159.121.6

2.Menentukan IP local yang akan kita gunakan buat client

Setting IP MGW :
1.[root@mgw cachak]$ vi /etc/sysconfig/network
lalu isi dengan :

NETWORKING=yes
HOSTNAME=mgw.domain.com
GATEWAY=202.159.121.1

lalu simpen dengan menekan :wq

2.Menconfigurasi IP eth0(default)

[root@mgw root]$ vi /etc/sysconfig/network-scripts/ifcfg-eth0
lalu isi dengan :

DEVICE=eth0
BOOTPROTO=static
IPADDR=202.159.121.2
BROADCAST=202.159.121.7
NETMASK=255.255.255.249
ONBOOT=yes
USERCTL=no

lalu simpen dengan menekan :wq

3.Setting dns resolve

[root@mgw root]$ vi /etc/resolv.conf
lalu isi dengan nameserver dari isp kita tadi :

nameserver 202.159.0.10
nameserver 202.159.0.20

lalu simpen dengan menekan :wq

4.Setting ip_forwarding

[root@mgw cachak]$ vi /etc/sysctl.conf

rubah net.ipv4.ip_forward = 0 menjadi net.ipv4.ip_forward = 1
atau kalau gak ada net.ipv4.ip_forward = 0 tambahin net.ipv4.ip_forward = 1

simpen dengan menekan :wq

5.restart network
[root@mgw cachak]$ /etc/init.d/network restart
Shutting down interface eth0: [ OK ]
Shutting down loopback interface: [ OK ]
Disabling IPv4 packet forwarding: [ OK ]
Setting network parameters: [ OK ]
Bringing up loopback interface: [ OK ]
Bringing up interface eth0: [ OK ]

[root@www root]#chkconfig --level 2345 network on
[root@www root]#

6.testing dengan ngeping ke default gateway 202.159.121.1

[root@mgw cachak]$ ping 202.159.121.1
PING 202.159.121.1 (202.159.121.1) 56(84) bytes of data.
64 bytes from 202.159.121.1: icmp_seq=1 ttl=63 time=0.356 ms
64 bytes from 202.159.121.1: icmp_seq=2 ttl=63 time=0.269 ms
64 bytes from 202.159.121.1: icmp_seq=3 ttl=63 time=0.267 ms
64 bytes from 202.159.121.1: icmp_seq=4 ttl=63 time=0.268 ms

--- 202.159.121.1 ping statistics ---
4 packets transmitted, 4 received, 0% packet loss, time 2997ms
rtt min/avg/max/mdev = 0.267/0.290/0.356/0.038 ms

7.testing untuk ngeping google.com untuk ngecek dns nya
kalau muncul :
PING google.com (216.239.39.99) 56(84) bytes of data.
berarti dns kita untuk mgw dah bekerja, tapi kalau muncul :
ping: unknown host google.com
berarti dns yang kita isikan di /etc/resolve.conf masih salah,
silahkan cek lagi ke ISP nya

nah bereskan sudah setting IP untuk mgw nya
supaya mgw ini bisa sekaligus di gunakan sebagai ns server
oleh client maka harus di install daemon bind atau
daemon nameserver yang lain
ataukalau sudah ada tinggal idupin Bind nya

[root@www root]# /etc/init.d/named restart
Stopping named: [ OK ]
Starting named: [ OK ]
[root@www root]#chkconfig --level 2345 named on
[root@www root]#

misalnya ip ke client adalah :
192.168.0.1/24
IP : 192.168.0.1
netmask : 255.255.255.0
broadcast : 192.168.0.255
RANGE IP CLIENT : 192.168.0.2-192.168.0.254

Setting ip untuk eth1 (yang ke client)
1.memberi IP 192.168.0.1 di eth1
[root@mgw cachak]$ vi /etc/sysconfig/network-scripts/ifcfg-eth1
lalu isi dengan :

DEVICE=eth1
BOOTPROTO=static
IPADDR=192.168.0.1
NETMASK=255.255.255.0
BROADCAST=192.168.0.255
ONBOOT=yes
USERCTL=no

lalu simpen dengan menekan :wq

2.Restart networknya

[root@mgw root]$ /etc/init.d/network restart
Shutting down interface eth0: [ OK ]
Shutting down interface eth1: [ OK ]
Shutting down loopback interface: [ OK ]
Disabling IPv4 packet forwarding: [ OK ]
Setting network parameters: [ OK ]
Bringing up loopback interface: [ OK ]
Bringing up interface eth0: [ OK ]
Bringing up interface eth1: [ OK ]

3.Testing dengan cara ping ip eth1
[root@mgw cachak]$ ping 192.168.0.1
PING 192.168.0.1 (192.168.0.1) 56(84) bytes of data.
64 bytes from 192.168.0.1: icmp_seq=1 ttl=63 time=0.356 ms
64 bytes from 192.168.0.1: icmp_seq=2 ttl=63 time=0.269 ms
64 bytes from 192.168.0.1: icmp_seq=3 ttl=63 time=0.267 ms
64 bytes from 192.168.0.1: icmp_seq=4 ttl=63 time=0.268 ms

--- 192.168.0.1 ping statistics ---
4 packets transmitted, 4 received, 0% packet loss, time 2997ms
rtt min/avg/max/mdev = 0.267/0.290/0.356/0.038 ms

Tinggal Setting IP computer client dengan ketentuan di bawah ini :

IP : 192.168.0.2 - 192.168.0.254
GATEWAY : 192.168.0.1
NETMASK : 255.255.255.0
BROADCAST : 192.168.0.255
NAMESERVER : 192.168.0.1

misal :

Client01
===============================
IP : 192.168.0.2
GATEWAY : 192.168.0.1
NETMASK : 255.255.255.0
BROADCAST : 192.168.0.255
NAMESERVER : 192.168.0.1

Client02
===============================
IP : 192.168.0.3
GATEWAY : 192.168.0.1
NETMASK : 255.255.255.0
BROADCAST : 192.168.0.255
NAMESERVER : 192.168.0.1

dan seterusnya sesuai banyaknya client,yang berubah hanya IP
untuk client windows maka setting IP
di bagian Start Menu/Setting/Control Panel/Network

setelah di setting ip client, maka coba ping ke 192.168.0.1
dari client,kalau berhasil berarti client dan MGW nya sudah tersambung.

Setting MGW supaya client bisa internat dengan menggunakan NAT

1.Matikan iptablesnya

[root@mgw root]# /etc/init.d/iptables stop
Flushing all chains: [ OK ]
Removing user defined chains: [ OK ]
Resetting built-in chains to the default ACCEPT policy: [ OK ]
[root@mgw root]#

2.Tambahkan iptables untuk Source NAt sesuai dengan ip di eth0
[root@mgw root]# /sbin/iptables -t nat -A POSTROUTING
-o eth0 -s 192.168.0.0/24 -j SNAT --to-source 202.159.121.2
[root@mgw root]# /sbin/iptables-save > /etc/sysconfig/iptables
[root@mgw root]# /etc/init.d/iptables restart
Flushing all current rules and user defined chains: [ OK ]
Clearing all current rules and user defined chains: [ OK ]
Applying iptables firewall rules: [ OK ]
[root@mgw root]# iptables-save

SNAT sudah,SNAT disini standar sekali dan gak ada proteksi
untuk mengetest nya kita browser di client lalau buka google.com,
kalau jalan berati kita sudah berhasil


[cachak@cachak ~]$ cat /etc/resolv.conf
search brawijaya.ac.id
nameserver 127.0.0.1
nameserver 202.162.220.110
nameserver 202.162.220.220

Saturday, October 10, 2009

bandwidth management MikroTik

One of the ways to avoid network traffic ‘jams’ is usage of traffic shaping in large networks. Traffic shaping and bandwidth allocation is implemented in the MikroTik RouterOS as queuing mechanism. Thus, the network administrator is able to allocate a definite portion of the total bandwidth and grant it to a particular network segment or interface. Also the bandwidth of particular nodes can be limited by using this mechanism.
Further on, several examples of using bandwidth management are given arranged according to complexity:
Example of Emulating a 128k/64k Line

Assume we want to emulate a 128k download and 64k upload line connecting IP network 192.168.0.0/24. The network is served through the Local interface of customer's router. The basic network setup is in the following diagram:
128/64k Line
The IP addresses and routes of the MikroTik router are as follows:

[MikroTik] > ip address print
Flags: X - disabled, I - invalid, D - dynamic
# ADDRESS NETWORK BROADCAST INTERFACE
0 10.0.0.217/24 10.0.0.217 10.0.0.255 Public
1 192.168.0.254/24 192.168.0.0 192.168.0.255 Local
[MikroTik] > ip route print
Flags: X - disabled, I - invalid, D - dynamic, J - rejected,
C - connect, S - static, R - rip, O - ospf, B - bgp
# DST-ADDRESS G GATEWAY DISTANCE INTERFACE
0 S 0.0.0.0/0 r 10.0.0.1 1 Public
1 DC 192.168.0.0/24 r 0.0.0.0 0 Local
2 DC 10.0.0.0/24 r 0.0.0.0 0 Public
[MikroTik] >

Assume you want to limit the bandwidth to 128kbps on downloads and 64kbps on uploads for all hosts on the LAN. Bandwidth limitation is done by applying queues for outgoing interfaces regarding the traffic flow. It is enough to add two queues at the MikroTik router:
[MikroTik] queue simple>
add name=Down interface Local limit-at 128000
add name=UP interface Public limit-at 64000
[MikroTik] queue simple> print
Flags: X - disabled, I - invalid
0 name=Down src-address=0.0.0.0/0 dst-address=0.0.0.0/0 interface=Local
limit-at=128000 queue=default priority=8 bounded=yes
1 name=UP src-address=0.0.0.0/0 dst-address=0.0.0.0/0 interface=Public
limit-at=64000 queue=default priority=8 bounded=yes

[MikroTik] queue simple> .. tree print
Flags: X - disabled, I - invalid, D - dynamic
0 D name=Down parent=Local flow="" limit-at=128000 max-burst=20
queue=default priority=8 weight=1 allot=1514 bounded=yes bytes=60
packets=1
1 D name=UP parent=Public flow="" limit-at=64000 max-burst=20
queue=default priority=8 weight=1 allot=1514 bounded=yes bytes=4169
packets=30

[MikroTik] queue simple>

Leave all other parameters as set by default. The limit is approximately 128kbps going to the LAN and 64kbps leaving the client's LAN. Please note, that the queues have been added for the outgoing interfaces regarding the traffic flow.

To monitor the traffic flow through the interface while doing file transfer, use the '/interface monitor-traffic' command:

[MikroTik] interface> monitor-traffic Public
received-packets-per-second: 9
received-bits-per-second: 4.32kbps
sent-packets-per-second: 6
sent-bits-per-second: 65.58kbps

received-packets-per-second: 7
received-bits-per-second: 3.36kbps
sent-packets-per-second: 10
sent-bits-per-second: 65.15kbps

received-packets-per-second: 11
received-bits-per-second: 5.66kbps
sent-packets-per-second: 7
sent-bits-per-second: 52.70kbps

[MikroTik] interface>
If you want to exclude the server from being limited, add two queues for it with limit-at=0 (no limit) and move them to the top:
[MikroTik] queue simple>
add name=Serv_D interface=Local dst-address=192.168.0.17/32 limit-at=0
add name=Serv_U interface Public src-address=192.168.0.17/32 limit-at=0
[MikroTik] queue simple> print
Flags: X - disabled, I - invalid
0 name=Down src-address=0.0.0.0/0 dst-address=0.0.0.0/0 interface=Local
limit-at=128000 queue=default priority=8 bounded=yes
1 name=UP src-address=0.0.0.0/0 dst-address=0.0.0.0/0 interface=Public
limit-at=64000 queue=default priority=8 bounded=yes
2 name=Serv_D src-address=0.0.0.0/0 dst-address=192.168.0.17/32
interface=Local limit-at=0 queue=default priority=8 bounded=yes
3 name=Serv_U src-address=192.168.0.17/32 dst-address=0.0.0.0/0
interface=Public limit-at=0 queue=default priority=8 bounded=yes

[MikroTik] queue simple> move 2 0
[MikroTik] queue simple> move 3 1
[MikroTik] queue simple> print
Flags: X - disabled, I - invalid
0 name=Serv_D src-address=0.0.0.0/0 dst-address=192.168.0.17/32
interface=Local limit-at=0 queue=default priority=8 bounded=yes
1 name=Serv_U src-address=192.168.0.17/32 dst-address=0.0.0.0/0
interface=Public limit-at=0 queue=default priority=8 bounded=yes
2 name=Down src-address=0.0.0.0/0 dst-address=0.0.0.0/0 interface=Local
limit-at=128000 queue=default priority=8 bounded=yes
3 name=UP src-address=0.0.0.0/0 dst-address=0.0.0.0/0 interface=Public
limit-at=64000 queue=default priority=8 bounded=yes
[MikroTik] queue simple>

Sunday, September 27, 2009

It protects against session cracks

It protects against session cracks, floods, search overloads, worm attacks, BruteForce Attacks, Mass Mailing and much more to reduce Traffic and to protect Board and other MODs.

FEATURES:
## - Worm & Exploit protection Unit with heuristic engine and more than 280 definitions
## - SQL Injection detector for GET, POST, ... Vars
## - Attack Counter function
## - Checksum Scanner to detect PHP Files wich were changed
## - Recovery System for the board configuration table
## - 8 different footer layouts
## - File Security Scanner wich detects general security issues in phpBB Files
## - Global Message Function
## - IP Blocker Engine
## - Proxy Blocker Engine
## - UserAgent Blocker Engine
## - Comfortable LOG Manager to view attack logfiles and manage the files
## - Selftest system
## - Automatically check file permissions on the logfiles
## - Show Security Tipps for your Server and Board

## - Maintenance function
## - "Miserable User" function to easily block userposts in viewtopic.php
## - Adjustable main logfile size
## - Completely new and modern layout in ACP and Forum
## - Every feature can easily be activated or deactivated over ACP
## - Search Flood Protection for Guests and Users
## - Login Brute Force Protection System
## - Detect wrong Logins and save them in your logfile
## - Login History for Users
## - IP Range Scanner to detect account abuse
## - Spammer Detection System
## - Detect human registered Spammer (Spam Detection Boost)
## - Spammer Keyword Detection for Posts and Profile
## - Registration Protection
## - Registration IP Scanning
## - Account Password Expire Function
## - Account Password Complexity Function
## - Account Password Length Control
## - Emergency console wich can restore board configuration Table without running phpBB
## - Password Reset Flood Protection
## - Massmail Protection System
## - Auto Recovery Board Settings
## - Visual Confirmation for Guest Postings
## - Protect from "Throw Away Mailservices"
## - Automatically detect misconfiguration of sensible Board Settings
## - Very fast code and OOP with Class Files etc.
## - Protect from overwriting sensible vars
## - and many more

* 2008-02-18 - Version 5.0.6
* Added new detection definitions to Heuristic engine (reported by peterh)
* Checked phpBB 2.0.23 Compatibility

DOWNLOAD
http://www.webanax.com/download/dc.php?dcid=21301570

Friday, September 18, 2009

WHAT IS A POEM?

A poem is a pair of phrases to express thoughts and feelings.
A poem is not to reassure the ability to rhyme.
It is not to show the ability to bring a tear to the eye,
nor is it to show one has skills to bring smiles to faces.
It is to let the world know that you are a human being.
A human being who shares what he/she might feel
inside with many others. A poem is a bunch of words
put together to let the world know that you are ALIVE,
to let the world know that you EXIST.

A poem is written by one who has a handicap
in expressing out loud what is kept at heart, mind and soul.
A poem is to help others understand.
Understand what others feel and why they feel the way they do.
For there might be many ways to express feelings or thoughts.
One might express by crying, laughing, jumping, screaming
or maybe even being silent.
These are ways to express out loud and let nearby loved ones
know how you feel.
All these ways of expressing might only last a few minutes or hours.
They will go away and few will know but not understand.
But when these feelings are shared on paper, these thoughts
can be passed on and on and on.
So, you see, a poem is a beauty, a form of art.
Many will admire, many will understand.
Who knows, maybe a poem can even bring peace to the world.

Thursday, September 10, 2009

Your subscription is now complete.

Thank you for subscribing to our mailing list.

Your subscription is now complete. If you have any questions you can
contact us by replying to this email.

Wednesday, August 12, 2009

Google mechanically search new Generasion

middle to in secrecy stand by to launch new change [at] his searcher machine. Likely, attendance of searcher machine Bing from Microsoft make search engine they require to do some repairs.
this United States company have merilis preview from his searcher machine which have improve;repaired [by] pass blog Google Webmaster Central Blog.
In a few last month;moons, big team from Google work in a secret project, namely a new generation architecture in seeking web Google," that way postingan article in blog that.

Correction done in so many dimension be like speed of index, accuration and equipment of seeking result. Google tell that distorting still not yet can be seen [by] most user, but will alter the list of result of seeking.
In a tes done blog technological Mashable, new searcher machine Google this quicker proven and present sejumkah difference of moment present the seeking result compared to version before all.
Even you not yet will see a number of differences, this [is] really a upgrading komplet Google. Do not only quickly but in tes we also

Friday, July 24, 2009

Mencari Jalan Pintas di Firefox

Biasanya sebuah aplikasi selalu menyediakan sebuah shortcut yang dapat difungsikan dengan menekan beberapa kombinasi tombol. Nah, 'jalan pintas' apa saja yang dapat digunakan dalam Firefox versi 3.xx.
Mungkin sebagian pengguna sudah familiar dengan beberapa shortcut yang ada dalam browser Firefox, seperti Ctrl + Tab untuk membuka tab baru, Ctrl + Shitf + Tab untuk membuka kembali Tab yang telah tertutup, ataupun Ctrl + W untuk menutup Tab yang sedang aktif.

Namun hal tersebut masih sebagian kecil shortcut yang digunakan, karena sesungguhnya pengguna masih dapat memanfaatkan mouse sebagai sarana mempelancar aktifitas browsing. Seperti fungsi yang telah coba, apa sajakah itu?
  • Shift + Scroll Up : Menuju ke halaman selanjutnya.
  • Shift + Scroll down : Kembali ke halaman sebelumnya.
  • Ctrl + Scroll Up : Berfungsi untuk memperbesar halaman web.
  • Ctrl + Scroll down : Berfungsi untuk memperkecil halaman web.
  • Middle-click on Tab : Menutup Tab yang sedang aktif.
  • Double-Click on Tab Bar : Membuat Tab baru dalam browser.
Mozilla memang coba menawarkan kemudahan berinternet kepada penggunanya dengan memberikan sistem navigasi yang cepat melalui keyboard ataupun mouse.

Thursday, July 16, 2009

Patch The Hole Microsoft Video ActiveX Control.

Microsoft middle do the investigation, related/relevant of susceptance problem at Microsoft Video ActiveX Control. its Section ' hackers illusory' success have penetrate the gap kemanan, through the system.
Activex controls by xself is system Microsoft the laboring application distribution conduciveness in internet through web browser. Application the example to collect the data, see the file and display the animation and or video base on internet.
Based on description opening from Microsoft, concerning their newest security update, namely Microsoft Security Advisory ( 972890), following are step to ' patch the hole
Download file from Microsoft following This Link
run and install the file .msi the to deactivate ActiveX control. To return settingan early, download and run install the file .msi from link ' Disable workaround' the.

Tuesday, July 14, 2009

Take parameters appropriately by value C++

Summary
Parameterize well: Distinguish among input, output, and input/output parameters, and between value and reference parameters. Take them appropriately.
Discussion
Choosing well among values, references, and pointers for parameters is good habit that maximizes both safety and efficiency.
Although efficiency should not be our primary up-front concern , neither should we write needlessly inefficient code when all other things, including clarity, are equal.

Prefer to follow these guidelines for choosing how to take parameters. For input-only parameters:
Always const-qualify all pointers or references to input-only parameters.
Prefer taking inputs of primitive types (e.g., char, float) and value objects that are cheap to copy (e.g., Point, complex) by value.
Prefer taking inputs of other user-defined types by reference to const.
Consider pass-by-value instead of reference if the function requires a copy of its argument. This is conceptually identical to taking a reference to const plus doing a copy, and it can help compiler to better optimize away temporaries.
For output or input/output parameters:
Prefer passing by (smart) pointer if the argument is optional (so callers can pass null as a "not available" or "don't care" value) or if the function stores a copy of the pointer or otherwise manipulates ownership of the argument.
Prefer passing by reference if the argument is required and the function won't store a pointer to it or otherwise affect its ownership. This states that the argument is required and makes the caller responsible for providing a valid object.

Friday, July 10, 2009

Make Equalizer Musik Versi 3D


Even draw in application vektor, you still able to play with the picture of 3D. Yes, this application usable make the picture of three dimension in course of drawing obyek. This thank to attending of of facility “ Extrude Tool” making the process creation of impression of 3D becoming easier.
To exploit it, you can follow the guidance make the picture equalizer music of 3D with CorelDRAW X4 following. Tool the [is] sameness is also you can apply [at] obyek other be like text, for example to make the text of 3D be like comic title Superman.
This his stages;steps:
1. Equalizer is usual gorgeous box formation appear [in/on] device of amplifier. To early making, make a box with [ Rectangle Tool]. Klik-Tarik pointer at the same time depress [ Ctrl] to form the [is] equilateral parallelogram.

2. To make the overall box, click [ Edit] >> [ Step and Repeat…]. Docker Step and Repeat will emerge. Make the vertical overall box. Fill in the boxes amount will be made by theX the box “ Number of copies:”. [At] “ Horizontal Settings”, select;choose [ Offset], and fill in the box “ Distance“ with 0,0.
3. [At] “ Vertical Settings”, select;choose [ Spacing Between Objects], and fill in the number apart between box [at] box “ Distance”. Here, distance value filled 1,15 inch. Hereinafter, click [ Apply]. Hence new box, a number of values which have been “ Number of copies”, will emerge.
4. Selection all boxes with mengklik-tarik pointer in around overall. Making the overall box horizontally. Select;Choose [ Offset] and fill in 0,0 [at] “ Distance” in “ Vertical Settings”. Select;Choose [ Spacing Between Objects] and fill in the distance between box in “ Distance” [at] “ Horizontal Settings”.
5. Fill in the box duplications amount [at] “ Number of copies:”, then [ Apply]. Overall box will emerge. Overall box equalizer high unegual always, hence eliminating some of boxes by its click, then depress [ Delete]. Select all boxes, klik-kanan box, and select;choose [ Combine].
6. Present the effect of 3D. Click [ Extrude] in toolbox. Click [at] middle shares is overall box, then at the same time button [ Ctrl], click pointer up at under. Appearance of three dimension is now emerge. Try it colouring by click one of [the] colour in palette colour.
7. To start to to colour, clicking [ Pick Tool]. Click the overall box, then select;choose [ Arrange] >> [ Break Extrude Group Apart], or depress [ Ctrl] + [K]. Klik-Kanan [at] box, then select;choose [ Break Curve Apart]. Selection of one overall box vertikal]—boleh from right or left.
8. Select;Choose the colour to the overall the from palet colour in application window right. Hereinafter, give the colour of one per one complete [so/till]. Selection all boxes, then click [ Ctrl] + [G]. you can type the text to beautify desain.

6 Step Install free antivirus microsoft

Microsoft Security Essentials is antivirus free of charge from Microsoft. version Beta of this product have didownload for operating system Microsoft be like Windows 7 Beta and RC ( 32 or 64 beet), Vista RTM, SP1 and SP2 and also Windows XP SP3 32 beet.
Way pengunduhannya even also including easy to. Following is 6 kiat to menginstall Microsoft Security Essentials Beta
1. Ensure that the minimum specification PC Anda have fufilled to run this application. But don't worry, because software this including light. Following is the specification of his minimum:
* To XP-CPU with clock speed 500 MHz or higher
* To XP - Memory: 256 MB RAM or higher
* To Vista / W7 - CPU with clock speed 1.0 GHz or higher * To Vista / W7 - Memory: 1 GB RAM or higher
* VGA ( Display): 800 x 600 or higher * Storage: 140 MB

2. Ascertain the operating system used, [whether/ what] 32 beet or 64 beet.
3. Download [at] situs Microsoft following. Before all consumer have to do the registration Microsoft Connect beforehand, henceforth fill the brief survey from Microsoft.
4. [At] column download, select;choose the appropriate operating system.
5. Select;Choose your location, then click ' Download' under article Download Single File.
6. Then opened the file of result of unduhan, and follow the instruction hereinafter [so/till] Microsoft Security Essentilas attached.
Thank you for your interest in joining the Microsoft® Security Essentials Beta. We are not accepting additional participants at this time. Please check back at a later date for possible additional availability.
Sebagai alternatif, situs Softpedia menyediakan download MSE untuk beberapa versi:
- MSE untuk Windows XP
- MSE untuk Windows 7 & Vista 32 bit
- MSE untuk Windows 7 & Vista 64 bit

Thursday, July 9, 2009

make Emoticon in PHP

Hullo halo, udah old likely caw nulis this Come on ane will write the simple article, gimana the way of fetching/parsing/ngambil emoticon-emoticon kept in database, continue to change the selected symbols in text with file image emoticon. Okeh direct.
* First, which udah surely, made the tables by the name of emoticon, his field merely two: "id" with " alt". Practical to so that execute aja direct code below/under in phpMyAdmin.
CREATE TABLE `db_ente`.`emoticon` (
`id` INT NOT NULL AUTO_INCREMENT ,
`alt` VARCHAR( 100 ) NOT NULL ,
PRIMARY KEY ( `id` )
) ENGINE = MYISAM
Don'T forget to change ` db_ente` by the name of the database in computer ente. If there is no could dimembuat formerly with code below/under.
CREATE DATABASE `nama_db` ;

* Database all right, now remained masukkin his data, karna merely for trial and error, masukkin aja one record formerly.
INSERT INTO `db_ente`.`emoticons` (
`id` ,
`alt`
)
VALUES (
NULL , ':lol:'
);
With query above us masukkin alt emoticon ": lol:" ( lol = laughing out loud)
. * To image animation emoticon representing the symbol " lol", bikin/copy image wanted to directory emoticon/lol.gif. Become in the directory [is] equal to especial file, make the directory emoticon, trus copy of file image by the name of " lol.gif" ( haduh ribet gw ngomongnya). Ane [by] xself for this example [of] make animation from Plurk this one.
. * Now, function in PHP to fetching emoticon:
function fetch_emo($strnya) {
$hsl = $strnya;
$qE = mysql_query("SELECT * FROM emoticon") or die(mysql_error());
while ($aE = mysql_fetch_array($qE)) {
$offst = substr($aE["alt"], 1);
$img = "";
$hsl = str_replace($aE["alt"], $img, $hsl);
}
return $hsl;
}

* Last, implementation.
?
mysql_connect("localhost", "user", "password") or die(mysql_error()); //ganti sesuai MySQL ente
mysql_select_db("db_ente") or die(mysql_error());
?
html
head
title>Test Emoticon head
body
?
.$str_test = "Test kacang euy :lol:";
.$sesudah = .fetch_emo(.$str_test);
echo "Sebelum: $str_test

";
echo "Sesudah: $ssd";
?
body
html

Hasilnya:
Sebelum: Test kacang euy :lol:
Sesudah: Test kacang euy
Now, ane jelasin few [of] his [job/activity] way.
In first step and both, we draw up the database mo dipake to nyimpan string selected which mo di-replace with emoticon.
Karna kept in database, we can easily ngapus or nambah emoticon-emoticon newly.
In function fetch_emo() which we make in step fourth, we do query to database, and nge-parse one string emoticon ( in above example [of] ": lol:"), trus changed with image in directory emoticon/lol.gif. So, possibly [at] the questioning, lol.gif dapet where from ?? In this function, so that we is caw require to busy define path image, ane make path imagenya taken away from string among dots of two (":") added with ekstensi ". gif", so that kalo string emoticon-nya ": lol:", mean path image-nya is " lol.gif".

How To Do Everything With YouTube

The easy way for anyone to create videos and share them with millions of viewers worldwide
With more than 20 million unique users, YouTube gives everyone--from casual Web users to serious video artists--access to a huge global audience. This hands-on guide leads you simply and easily through the processes of creating, posting, and promoting videos on the world's most popular online service.
How to Do Everything with YouTube explains how to shoot and edit videos, insert titles and captions, add special effects, and upload content. You will learn to set up a YouTube channel and integrate YouTube videos into your personal blogs and MySpace pages. The success secrets of YouTube celebrities are revealed, and examples of breakout videos are discussed.
From the Back Cover
Create, post, and promote your own videos on the world's most popular online service! How to Do Everything with YouTube explains how to shoot and edit videos, insert titles and captions, add special effects, and upload content. You'll learn how to set up a YouTube channel and integrate YouTube videos into your websites and blogs. You'll also discover the success secrets behind YouTube celebrities and breakout videos. Share your unique video creations with millions of viewers with help from this easy-to-follow guide.

Navigate the YouTube interface, play videos, and set up an account
* Shoot professional-quality videos with a camcorder, Web cam, or camera phone
* Get the lighting right and add sound and special effects
* Create a short film, vlog, or video mashup
* Edit your videos with Windows Movie Maker, iMovie, and Remixer
* Add audio tracks with AudioSwap
* Optimize your videos and upload them to YouTube
* Join the YouTube community, create playlists, subscribe to channels, and participate in groups
* Customize your YouTube channel
* Promote your videos to a huge audience

http://uploading.com/files/VI4F6PLV/HTDEWYT.rar.html

Wednesday, July 8, 2009

7 step to upgrade iPod Touch OS 3.0 with free of charge

Apple finally launch iPhone 3.0 Software updated, which claimed come with addition of function and also fitur newly. Update OS the is addressed for consumer iPhone and iPod Touch in all the world.
Consumer iPhone 2G and 3G truely can mengunduh iPhone OS 3.0 software free of chargely, but consumer darling iPod Touch obliged by theX payee US$ 9,95. Even also unnecessary to that way worry, [is] not illusory world [of] him name if could not provide the free alternative product, including for owner iPod Touch which wish mengunduh OS 3.0 freely.
following is 7 step to upgrade iPod Touch OS 3.0 with free of charge:
1. Download and install iTunes 8.2

2. Download iPod Touch 2G Firmware 3.0 IPSW and iPod Touch 1G Firmware 3.0 IPSW. If result unduhan still in form of .zip, change ekstension to .ipsw
3. joint iPod Touch to PC
4. Open iTunes 8.2 and select iPod Touch from device list
5. hold up Shift, and klik Restore
6. find iPod Touch file, .ipsw
7. wait proses update iPod Touch to finish.

Tuesday, July 7, 2009

Top Virus Dangerous

Serangan malware kian menggila. Ada begitu banyak jenis malware yang mengintai dan siap menyerang pengguna komputer.
Berikut daftar nama-nama malware terganas yang beredar periode 18 Juni 2009-25 Juni 2009, menurut laporan Kaspersky Lab.
1. Net-Worm.Win32.Kido.ih ( 41.9714%)
2. Exploit.Win32.SqlShell.a (9.7527%)
3. HEUR:Trojan.Win32.Generic (7.6628%)
4. Heur.Win32.Trojan.Generic (3.309%)
5. Trojan.Win32.FraudPack.owo (3.1%)
6. Trojan-Downloader.Win32.Agent.cgns (2.5427%)
7. Trojan.Win32.Agent.cltm (1.846%)
8. Trojan.Win32.FraudPack.oxv (1.7416%)
9. Trojan-Dropper.Win32.Small.axv (1.5674%)
10. Trojan.Win32.FraudPack.ovx (1.5674%)

11. Trojan-PSW.Win32.Agent.nfo (1.3236%)
12. Trojan.Win32.Buzus.bhqc (1.2539%)
13. Trojan.Win32.Agent2.kov (1.1494%)
14. Net-Worm.Win32.Kido.dam.y (1.1146%)
15. Heur.Win32.Invader (0.8708%)
16. Net-Worm.Win32.Kido.eo (0.8011%)
17. Trojan.Win32.Monder.cmwt (0.8011%)
18. Trojan-GameThief.Win32.Magania.bfru (0.7315%)
19. Trojan-Downloader.Win32.Agent.ansh (0.6618%)
20. Trojan-Dropper.Win32.Agent.zje (0.5921%
21. Trojan-Downloader.Win32.Agent.cgew (0.5921%)
22. Trojan-Downloader.Win32.Agent.wxq (0.5573%)
23. not-a-virus:Porn-Dialer.Win32.InstantAccess.f(0.5573%)
24. Trojan-GameThief.Win32.Magania.bfrp (0.5225%)
25. Trojan-Downloader.Win32.Small.jvl (0.5225%)
26. Net-Worm.Win32.Koobface.d (0.4528%)
27. Trojan-Downloader.Win32.Injecter.cqd (0.418%)
28. HEUR:Trojan-Downloader.Win32.Generic (0.3831%)
29. Virus.Win32.Sality.aa (0.3135%)
30. not-a-virus:AdWare.Win32.Relevant.n (0.3135%)
31. Trojan-GameThief.Win32.Magania.bfdq ( 0.2786%)
32. not-a-virus:AdWare.Win32.Agent.lmz (0.2786%)
33. not-a-virus:AdWare.Win32.Shopper.l (0.209%)
34. Trojan-GameThief.Win32.Magania.bful (0.209%)
35. Trojan-GameThief.Win32.WOW.bie (0.209%)
36. not-a-virus:WebToolbar.Win32.FenomenGame.pxu (0.1742%)
37. Trojan-Dropper.Win32.Small.dhn (0.1742%)
38. Exploit.Win32.DCom.ad
39. Trojan-GameThief.Win32.Magania.bffe (0.1742%)
40. Trojan-GameThief.Win32.Magania.bfws (0.1742%)
41. Trojan-Banker.Win32.Banker.aifb (0.1742%)
42. Packed.Win32.Black.d (0.1742%)
43. Trojan.Win32.Agent.cgof (0.1393%)
44. Trojan-Dropper.Win32.Small.ayg (0.1393%)
45. Trojan-Downloader.Win32.FraudLoad.wcby (0.1393%)
46. Trojan-Downloader.Win32.Small.jwq ( 0.1393%)
47. Trojan-GameThief.Win32.OnLineGames.bktw ( 0.1393%)
48. MultiPacked.Multi.Generic (0.1393%)
49. HEUR:Backdoor.Win32.Generic (0.1045%
50. Suspicious.Win32.Packer (0.1045%)
51. Virus.Win32.Virut.ce (0.1045%)
52. Backdoor.Win32.IEbooot.dfe (0.1045%)
53. Trojan-Downloader.Win32.FraudLoad.erj ( 0.1045%)
54. Trojan-Dropper.Win32.Agent.atvx (0.1045%)
55. Backdoor.Win32.Agent.ahwn (0.1045%)
56. Multi.Win32.Packed (0.1045%)
57. HEUR:Trojan.Win32.Invader (0.1045%)
58. Trojan.Win32.Agent.abud (0.1045%)
59. Backdoor.Win32.Poison.ahgc (0.1045%)
60. Trojan-GameThief.Win32.Magania.bfsy (0.1045%)
61. Trojan-Downloader.Win32.Agent.cdid ( 0.1045%)
62. Trojan.Win32.Stuh.pdm (0.1045%)
63. Trojan.Win32.Buzus.bigq (0.1045%)
64. Backdoor.Win32.Small.icr (0.1045%)
65. Backdoor.Win32.Agent.ahgv (0.1045%)
66. Trojan.Win32.Agent.cngn (0.1045%)
67. Backdoor.Win32.Hupigon.aovn (0.1045%)
68. Trojan-Dropper.Win32.Agent.atmg ( 0.1045%)
69. Packed.Win32.Black.a (0.1045%)
70. HackTool.MSIL.KKFinder.q (0.0697%)
71. Trojan-Downloader.Win32.Small.aliy (0.0697%)
72. not-a-virus:AdWare.Win32.Webdir.e (0.0697%)
73. Email-Worm.Win32.Joleee.bwu (0.0697%)
74. HEUR:Virus.Win32.Generic (0.0697%)
75. Trojan-Dropper.Win32.Small.cdw (0.0697%)
76. Trojan.Win32.Agent.cccr (0.0697%)
77. Trojan.Win32.Midgare.mqa (0.0697%)
78. Backdoor.Win32.Bifrose.aknz (0.0697%)
79. Trojan.Win32.Agent.cmud (0.0697%)
80. not-a-virus:AdWare.Win32.Shopper.v (0.0697%)
81. Backdoor.Win32.Bifrose.fpb (0.0697%)
82. Trojan-Mailfinder.Win32.Mailbot.ec
83. Trojan.Win32.Agent.cjxh (0.0697%)
84. Trojan-Spy.Win32.Zbot.xdj (0.0697%)
85. P2P-Worm.Win32.Archivarius.b (0.0697%)
86. Virus.Win32.Sality.z (0.0697%)
87. HEUR:Worm.Win32.Generic (0.0697%)
88. Trojan-Dropper.Win32.Mudrop.ask (0.0697%)
89. Trojan.Win32.Agent2.hxw (0.0697%)
90. Trojan.Win32.Agent.cmnr (0.0697%)
91. Trojan.Win32.Agent.rzw (0.0697%)
92. Trojan-Downloader.Win32.FraudLoad.eki (0.0697%)
93. Trojan-Downloader.JS.Agent.gj (0.0697%)
94. not-a-virus:AdWare.Win32.AlexaBar.n (0.0697%)
95. Trojan.Win32.KillWin.pi (0.0697%)
96. not-a-virus:AdWare.Win32.Chiem.c (0.0697%)
97. Net-Worm.Win32.Kido.cy
98. Trojan-Downloader.Win32.Agent.cgaw(0.0348%)
99. Trojan-Dropper.Win32.Mudrop.aso (0.0348%)
100. Packed.Win32.Krap.c (0.0348%)

Sunday, July 5, 2009

Suzuka, the unsung Opteron


Sunnyvale-based chip maker Advanced Micro Devices came to the market with a new line of Opteron chips, shortly following the release of the six-core Opteron processor codenamed “Istanbul.” The new silicon solution, John Fruehe, director of Business Development for Server/Workstation products at AMD, says, comes under the codename “Suzuka” and hits the market as a quad-core processor developed for single-socket systems.

Suzuka doesn't seem to come to the shelves as a breathtaking product, yet it is intended to fulfill the needs of the cost-effective SME market. The latest AMD Opteron 1000 Series processor, Fruehe says, has not been developed to offer scalability, but will fit applications that are cost and power aware, such as web servers, small business servers and workstations.


The new chips come at speeds of 2.5GHz (Opteron 1381), 2.7GHz (Opteron 1385) and 2.9GHz (Opteron 1389), having been developed on the same core as the company's “Shanghai” CPU, another quad-core Opteron processor. Suzuka, manufactured under the 45-nm SOI process technology, comes with x86-64 processing cores on a monolithic die and features 512 KB of L2 cache per core, coupled with a shared 6 MB L3 cache.

The new processors will use the AM3 socket and not the 1207-pin Socket F, while also offering compatibility with existing AM2+ mobos (can be easily used on motherboards that work with Budapest quad-core chips – the single socket version of Barcelona). The new solutions feature system bus speeds of 2200 MT/s (HyperTransport bus actual speed of 1100 MHz), while sporting a rated TDP of around 115 W.

According to John Fruehe, the performance increase when moving from a quad-core “Budapest” chip to the new “Suzuka” is not the most impressive part in the process; the fact that the power consumption drops significantly with the new processor is. As for the price tags the new chips come to the market with, Opteron 1381 costs US $189, Opteron 1385 goes for $229, while Opteron 1389 has been priced at $269.

Wednesday, April 22, 2009

Sample developer app Facebook

Facebook installation instructions:
1. Add the developer app (http://www.facebook.com/developers/)
2. Setup a new application to get your API key and Secret key. You will also need to click optional fields and fill in your callback URL (the URL where the app files are stored on your server)
3. You also need to choose an app canvas URL. This can be anything you like that is available, but make a note of what you choose.
4. Finally, click "yes" to "Can your application be added to Facebook?" and then select "Users" for "Who can add it?".
5. That's it. Now install the files on your server and give it a shot!

App installation instructions:
1. Change your API KEY and SECRET in "appinclude.php" flie
2. Create a mysql database in your hosting and import "db.sql"
3. Modify "dbinfo.php" with your database name, database username and password
4. Change www.YOUR_DOMAIN.com to your domain name in all files
5. Change the canvas page url from "http://apps.facebook.com/YOUR_APP/" to your Canvas page url
6. Put gifts images in the "gifts" folder
NOTE: Each page will show 20 gift items... Right now the app is configured for 40 gift items. If you add more gifts please find the following in line 57
echo '<'a href="http://apps.facebook.com/YOUR_APP/?s=0">1<'a> | <'a href="http://apps.facebook.com/YOUR_APP/?s=21">2<'a>';
And add more links like this ... <'a href="http://apps.facebook.com/YOUR_APP/?s=41">3<'a>
7. Upload all files to your server and the app will be ready to go.

download


Tuesday, April 7, 2009

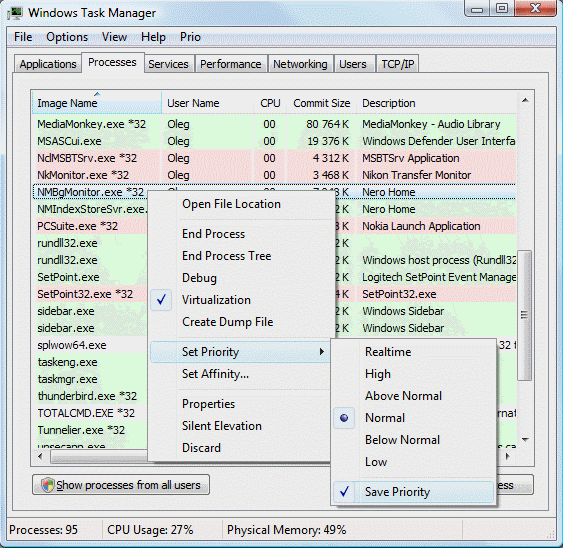
Process Priority Taskmanager


This compact program allows you to save the priority you specify for any process.

How to use -
# Start the Task Manager.
# Right-click a process and select Set Priority.
# Set the priority you want for the process.
Prio will save the applied changes and each time you start this process from now on, it will set the saved priority for it. You will not have to change the priority manually any more
What is the priority of an application?


Windows is a multitasking system. It means that a lot of various applications are running simultaneously in it. You directly work with some of them, but some of them work invisibly and independently. The priority of an application is a parameter that tells the system which task has priority over other tasks. For example, if there are two programs that are running simultaneously and with the same priority, they will have equal shares of the processor time. But in case you set a higher priority for one of them, the program that has this higher priority will use all the free processor time while the one with a lower priority will use only the rest of it. For example, if you have an application for rendering a video clip running on your computer, it will use the free processor time sharing it equally with, say, Explorer. It will result in Explorer working jerkily... But if you set a lower priority for the rendering program, it will use only the time that Explorer does not need. Explorer will work more smoothly and faster. It is also convenient to set a higher priority for multimedia players - the playback will be smoother. If you have some database service running on your computer, it is useful to set a lower priority for it so that it does not interfere with the work of those applications you are using at the moment. You can change the priority of processes on the Processes tab of Task Manager. Prio automatically detects any changes in priority and saves them in its settings. Next time you start this application, its priority will be restored.